Chocolate Cake Rich, Fudgy & Ready in Under an Hour
Chocolate cake is the kind of dessert that earns its place on every table, every time. Whether you need it for a birthday, a weekend treat, or an ordinary Tuesday that calls for something extra, this chocolate cake recipe delivers deep, fudgy flavor with a tender crumb that holds up beautifully. It works as a celebration centerpiece, a simple weeknight indulgence, or a make-ahead dessert for company. No complicated steps — just pure chocolate cake goodness on a plate.
Ingredients
For the Cake:
- 2 cups (250g) all-purpose flour
- 2 cups (400g) granulated sugar
- ¾ cup (75g) unsweetened cocoa powder (Dutch-process recommended)
- 2 tsp baking soda
- 1 tsp baking powder
- 1 tsp fine sea salt
- 2 large eggs, room temperature
- 1 cup (240ml) buttermilk [or 1 cup whole milk + 1 tbsp white vinegar, rested 5 minutes]
- 1 cup (240ml) strong brewed coffee, cooled [or hot water]
- ½ cup (120ml) neutral oil (vegetable, canola, or avocado oil)
- 2 tsp pure vanilla extract
For the Chocolate Frosting:
- 1 cup (225g) unsalted butter, softened
- 3 cups (360g) powdered sugar, sifted
- ½ cup (50g) unsweetened cocoa powder
- ¼ cup (60ml) heavy cream [or full-fat oat milk for a dairy-free version]
- 1 tsp pure vanilla extract
- Pinch of salt
Optional:
- ½ cup (90g) dark or semi-sweet chocolate chips, folded into the batter
- Sprinkles, shaved chocolate, or fresh berries for garnish
Step-by-Step Instructions
Step 1: Gather and Prep Your Ingredients
Pull your cold ingredients — eggs, buttermilk, butter — out of the refrigerator at least 30 minutes before you start. Room-temperature ingredients combine more evenly and give the cake a better, more consistent rise. Skipping this step is one of the most common reasons cakes come out dense.
Preheat your oven to 350°F (175°C). Grease two 9-inch round cake pans, then line each bottom with a circle of parchment paper. Greasing and lining together means clean release every time — no sticking, no crumbling when you unmold.
Pro Tip: Brew your coffee strong before you start. It won’t make the cake taste like coffee — it makes the chocolate taste more like chocolate.
Step 2: Mix Your Dry Ingredients
In a large bowl, whisk together the flour, cocoa powder, sugar, baking soda, baking powder, and salt until fully combined. Whisking does two things at once: it aerates the dry mix and breaks up any clumps of cocoa that would leave bitter pockets in the finished cake.
Don’t rush this step. Uneven dry mixing means uneven baking — pockets of baking soda or salt that throw off the texture and taste. Give it a full 30 seconds of active whisking before you move on.
Pro Tip: Dutch-process cocoa gives you a darker color and smoother, less acidic flavor — worth using if you can find it.
Step 3: Combine the Wet Ingredients
In a separate bowl or large measuring jug, whisk together the eggs, buttermilk, coffee, oil, and vanilla extract until smooth. The oil is doing serious work here — it keeps the crumb moist for days longer than a butter-based cake would.
Don’t skip the coffee, even if you dislike the taste. Coffee amplifies cocoa — it doesn’t compete with it. Hot water works as a substitute, but the depth you get from coffee is noticeably better. It’s one of the small details that separates a good chocolate cake from a great one.
Pro Tip: Mix your wet ingredients in a jug with a pour spout — adding them to the dry mix is far easier and less messy.
📖 Read More: Moist Chocolate Cake
Step 4: Bring the Batter Together
Pour the wet ingredients into the dry and whisk gently until just combined. The batter will look thin — almost watery. That’s exactly right. Thin batter bakes into a tender, fudgy crumb. Don’t add more flour. Trust the process.
If you’re using chocolate chips, fold them in now with a spatula — just a few turns, nothing more. Over-mixing activates gluten and makes the crumb tight and tough. Stop the moment you no longer see dry streaks.
Pro Tip: A few small lumps in the batter are completely fine — they disappear in the oven and have zero impact on the result.
Step 5: Pour Into the Pan and Bake
Divide the batter as evenly as you can between the two prepared pans. A kitchen scale makes this easy if you have one — equal weight means the layers bake at the same rate. Give each pan a firm tap on the counter to pop any large air bubbles.
Slide both pans onto the center rack and bake for 32–37 minutes. Start checking at the 30-minute mark. A toothpick inserted in the center should come out with a few moist crumbs — not wet batter, but not bone-dry either. Overbaking is the enemy of a moist chocolate cake.
Pro Tip: If your oven runs hot on one side, rotate both pans 180° halfway through baking.
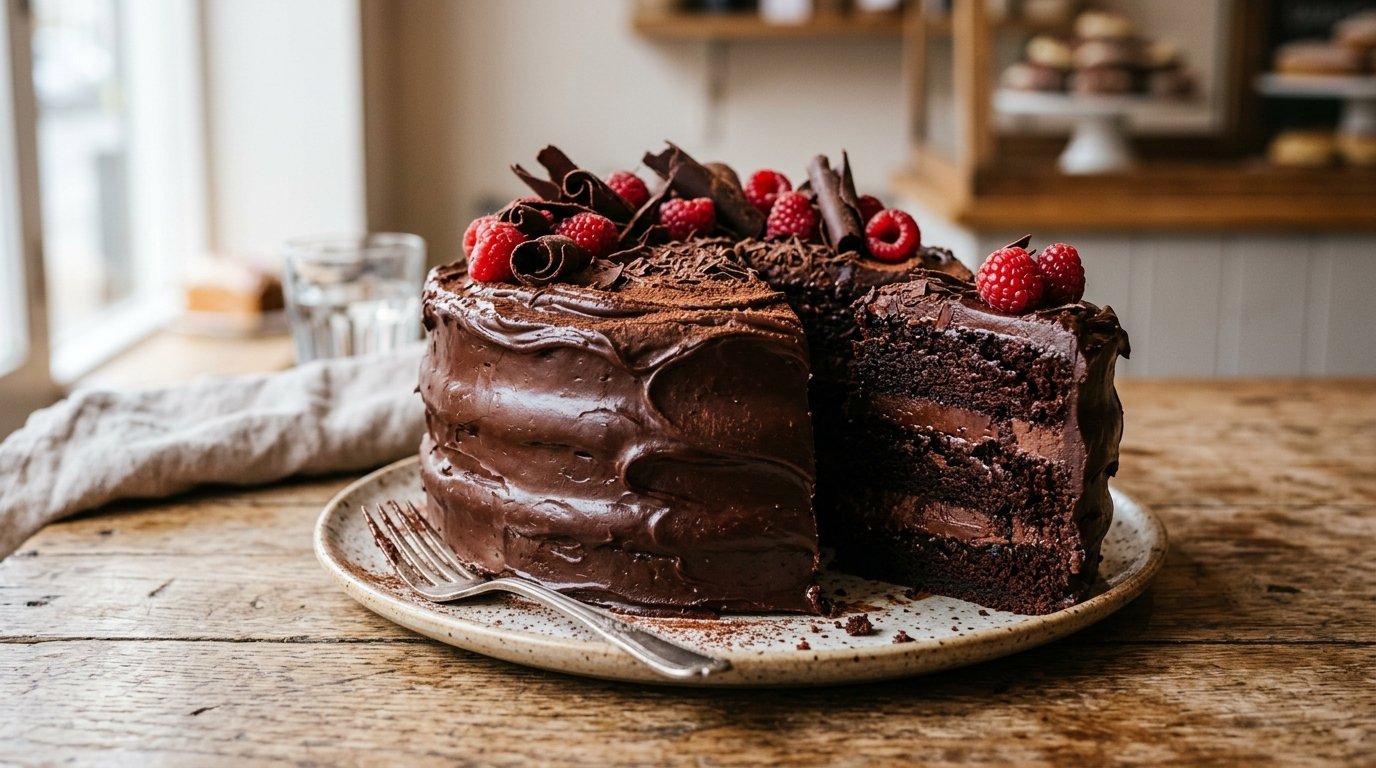
Step 6: Cool, Frost, and Serve
Let the cakes cool in their pans for 15 minutes before turning them out onto a wire rack. From there, they need at least 1 hour to cool completely before you frost them. Frosting a warm cake melts the buttercream and turns the whole thing into a sliding mess.
To make the chocolate frosting, beat softened butter until fluffy — about 2 minutes. Add cocoa powder, powdered sugar, cream, vanilla, and salt, then beat on medium-high for 3–4 minutes until smooth and spreadable. Frost the bottom layer, place the second layer on top, then frost the top and sides. Garnish as you like — shaved chocolate, berries, or a clean dusting of cocoa powder all work well.
Pro Tip: Refrigerate the frosted cake for 20 minutes before slicing — it makes clean, sharp cuts much easier.
Cook Time
Total Time: 55 minutes | Prep: 15 minutes | Bake: 35 minutes Allow an additional 60 minutes of cooling time before frosting. No special equipment required beyond a standard oven and two 9-inch round cake pans.
Servings
Serves 12 — one generous slice per person from a standard two-layer 9-inch round cake.
Nutritional Information (approx. per serving)
| Nutrient | Amount |
|---|---|
| Calories | 480 kcal |
| Fat | 22g |
| Saturated Fat | 10g |
| Carbohydrates | 68g |
| Protein | 5g |
| Sugar | 48g |
| Fiber | 3g |
| Sodium | 320mg |
| Iron | 2.8mg |
| Potassium | 220mg |
| Calcium | 55mg |
Values are approximate and will vary based on ingredients used.
Storage Instructions
Chocolate cake keeps best covered at room temperature for up to 2 days — the crumb stays soft and the frosting holds its shape without drying out. After that, move it to an airtight container in the refrigerator for up to 5 days. Cold cake firms up significantly; let each slice sit at room temperature for 20 minutes before serving.
Unfrosted cake layers freeze exceptionally well. Wrap each cooled layer tightly in plastic wrap, then in a layer of foil, and freeze for up to 3 months. Thaw overnight in the refrigerator, then frost once fully thawed. Never freeze a frosted cake — buttercream can weep and split as it defrosts, wrecking the texture.
For make-ahead convenience, you can also freeze the batter in the pans before baking — though baking from fresh batter always gives a better rise and crumb.
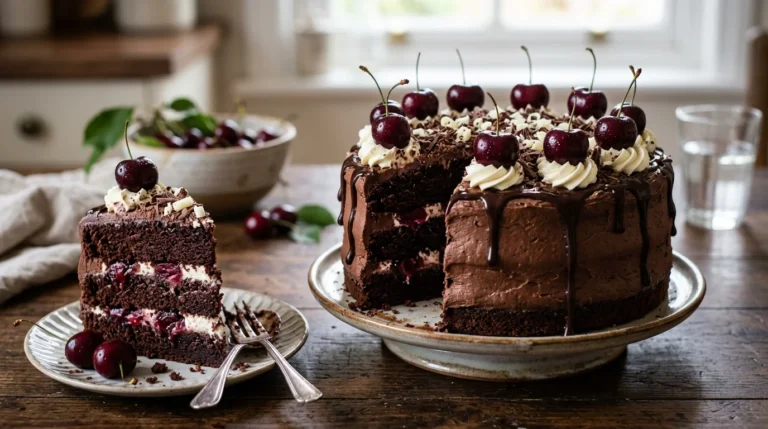
📖 Read More: Chocolate Cherry Cake
Suggestions
- Chocolate Cherry Version: Spread a layer of cherry jam or scatter fresh pitted cherries between the two cake layers before frosting. The tartness cuts through the richness and adds complexity. It turns a classic into something you’d serve at a dinner party without apology.
- High-Protein Twist: Replace ¼ cup of all-purpose flour with unflavored or chocolate protein powder. The texture stays tender and the slice becomes a genuinely satisfying post-workout treat. Great for anyone who wants indulgence and nutrition in one piece.
- Dairy-Free Chocolate Cake: Swap the buttermilk for oat milk plus 1 tbsp white vinegar, and use full-fat coconut cream in the frosting instead of heavy cream. The result is just as rich and fudgy — plant-based without tasting like a compromise.
- Kid-Friendly Funfetti Version: Fold ½ cup of mini rainbow sprinkles into the batter before baking for a colorful surprise inside each slice. Swap the chocolate frosting for a simple vanilla buttercream. Kids go wild for the reveal when the first slice is cut.
- Lighter Weight-Loss Version: Replace half the oil with unsweetened applesauce, and reduce the sugar to 1½ cups. Use a thin Greek yogurt-based frosting instead of buttercream. You lose calories, not flavor — and the crumb stays surprisingly moist.
- Espresso-Mocha Layer: Dissolve 2 tsp of instant espresso powder directly into the batter for a mocha-style depth that pairs beautifully with a mascarpone frosting. It’s grown-up and complex — the kind of chocolate cake that makes people ask for the recipe.
- Mexican Spice Version: Stir ½ tsp cinnamon and a pinch of cayenne into the dry ingredients before mixing. The warmth builds slowly through the chocolate and cinnamon rounds out the bitterness of the cocoa. Finish with a light dusting of cinnamon sugar and cocoa powder.
Seasonal Relevance
Fresh, high-quality cocoa is available year-round, which makes chocolate cake genuinely seasonless. That said, this recipe shines brightest during the colder months — October through February — when a rich, fudgy dessert feels most at home. If you’re baking in summer and want to keep the kitchen cooler, prep your batter early in the morning and bake before the heat peaks. For peak-season berries like fresh cherries or strawberries from June through August, use them as garnish or filling layers to brighten the richness of the chocolate.
Conclusion
This chocolate cake recipe is the one you come back to — not because it’s trendy, but because it works every single time. The batter comes together in minutes, the bake is straightforward, and the result is a deeply fudgy, beautifully layered cake that doesn’t ask much of you. Try it plain first, then experiment with the cherry version, the mocha twist, or the spiced variation. Once you have the base down, the possibilities are genuinely endless. A great chocolate cake doesn’t need to be complicated — it just needs good technique and honest ingredients.
FAQs
Q: Can I use frozen fruit or mix-ins instead of fresh? Frozen cherries, raspberries, and similar fruits work well folded into the batter or used as a filling layer — just thaw and drain them thoroughly first. Excess moisture from frozen fruit can make the crumb soggy if added wet. Pat them dry with paper towels before using and you’ll be fine.
Q: Why does my chocolate cake taste bitter or dry? Bitterness usually comes from over-measuring cocoa or using natural cocoa when Dutch-process is better suited to the recipe. Dryness is almost always caused by overbaking — even 5 extra minutes at 350°F makes a noticeable difference. Start checking at 30 minutes and pull the cake the moment your toothpick reads clean with moist crumbs.
Q: Can I make this without eggs? Yes — replace each egg with a flax egg (1 tbsp ground flaxseed + 3 tbsp water, rested 5 minutes) for a vegan-friendly version. The texture will be slightly denser, but the flavor stays strong. You can also use unsweetened applesauce (¼ cup per egg) as a binding substitute that keeps the crumb moist.
Q: What’s the best milk to use in the frosting? Heavy cream gives the smoothest, richest buttercream — that’s the first choice. If you need a dairy-free option, full-fat oat milk or canned coconut cream both work well. Avoid low-fat milks; they make the frosting too loose and it won’t hold its shape when piped or spread.
Q: How do I make the cake layers thicker and more dense? Use an 8-inch pan instead of a 9-inch — the batter is deeper and the layers bake up taller. You can also add 2 tbsp of sour cream or full-fat Greek yogurt to the wet ingredients to add density and richness. The crumb becomes noticeably fudgier and the layers hold their shape better when stacked.