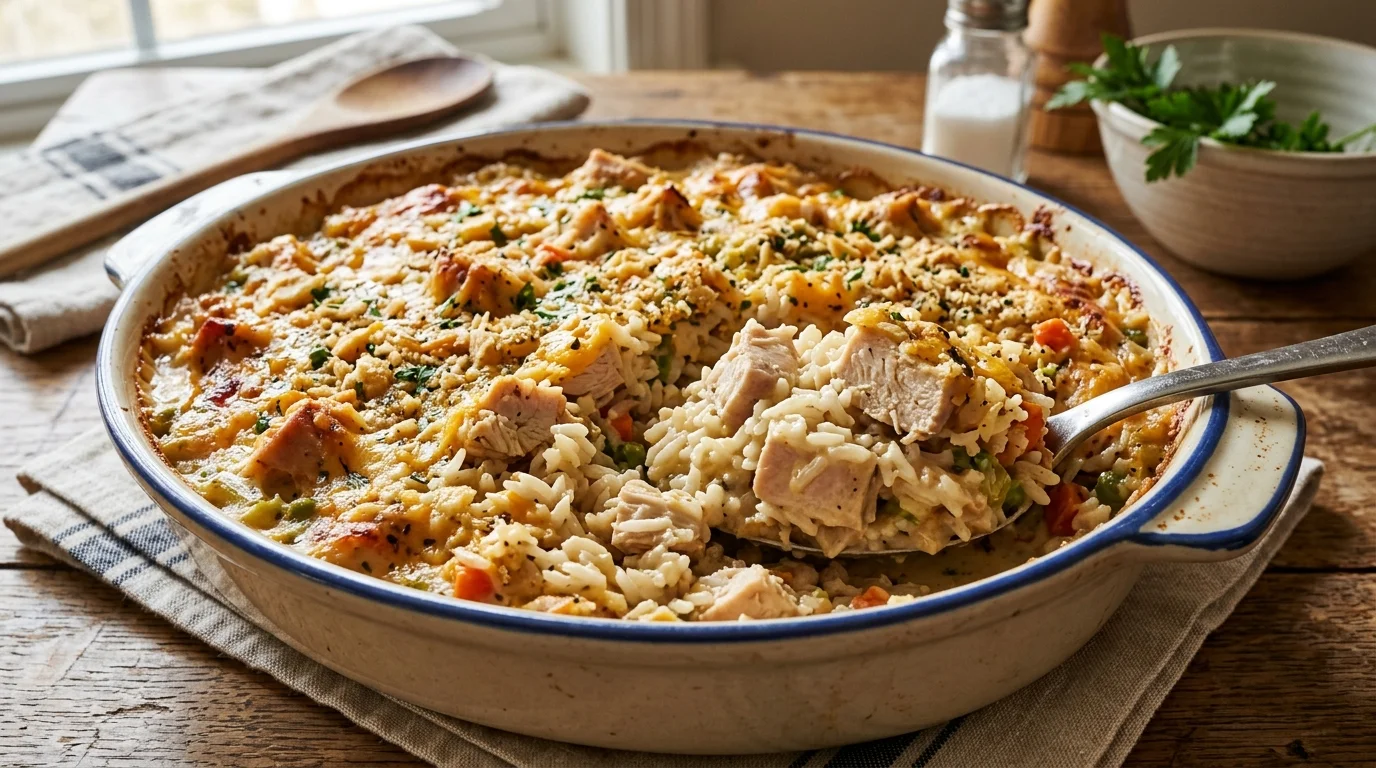
Chicken Rice Casserole Ready in 45 Minutes
Chicken rice casserole is the kind of dish that belongs in every home cook’s regular rotation. It’s the meal you make when the week has been long, the fridge needs clearing, and you want something that satisfies every single person at the table without any complaints. One baking dish, a handful of pantry staples, and a single oven does all the heavy lifting. Whether it’s a Sunday family dinner, a midweek meal prep session, or something you’re dropping off for a friend, this recipe delivers every time. No complicated steps — just pure chicken rice casserole comfort, done properly.
Ingredients
- 1.5 lbs (680g) boneless, skinless chicken breast or thighs, cut into bite-sized pieces [thighs stay juicier]
- 1 ½ cups long-grain white rice, uncooked [or brown rice — see pro tip]
- 2 ½ cups low-sodium chicken broth
- 1 can (10.5 oz) cream of mushroom soup [or cream of chicken soup]
- ½ cup sour cream [or plain Greek yogurt]
- 1 medium yellow onion, finely diced
- 3 cloves garlic, minced
- 1 cup frozen peas or mixed vegetables [thawed]
- 1 cup shredded cheddar cheese, divided
- 2 tbsp olive oil or unsalted butter
- 1 tsp garlic powder
- 1 tsp onion powder
- 1 tsp smoked paprika
- ½ tsp dried thyme
- Salt and black pepper, to taste
Optional Add-Ins:
- ½ cup sliced mushrooms (optional)
- ½ cup diced bell pepper (optional)
- ½ cup cream cheese, softened, for extra creaminess (optional)
- ¼ cup crispy fried onions for topping (optional)
- Fresh parsley, for garnish (optional)
Step-by-Step Instructions
Step 1: Gather and Prep Your Ingredients
Pull everything out and prep it fully before the oven goes on. Dice the onion, mince the garlic, cut the chicken into even 1-inch pieces, and thaw the frozen vegetables if you haven’t already. Even thickness on the chicken matters — uneven cuts mean some pieces dry out before others are cooked through. Measure the rice and broth ahead of time too, because once you start layering, you want to move quickly without stopping to measure mid-build.
Pro Tip: Pat the chicken pieces completely dry with paper towels before seasoning. Dry chicken browns in the pan — wet chicken steams, and that golden crust is what adds depth of flavour to the finished casserole.
Step 2: Season and Sear the Chicken
Heat olive oil or butter in a large oven-safe skillet or sauté pan over medium-high heat. Season the chicken pieces on all sides with smoked paprika, garlic powder, onion powder, salt, and black pepper. Add the chicken to the hot pan in a single layer and sear for 3–4 minutes per side until golden — don’t move it around while it’s cooking, or it won’t develop any colour. The chicken doesn’t need to be fully cooked through at this stage; it will finish in the oven. Transfer it to a plate and set aside.
Pro Tip: Don’t skip the sear. It might feel like an extra step, but the caramelised surface on the chicken is where a huge amount of the casserole’s final flavour comes from. A casserole made with unseared chicken is flat by comparison.
📖 Read More: Make Chicken Pasta Recipes
Step 3: Sauté the Aromatics and Build the Base
In the same pan you used for the chicken, reduce the heat to medium. Add a little more oil if needed, then add the diced onion. Cook for 3–4 minutes, stirring occasionally, until softened and translucent. Add the minced garlic and dried thyme and stir for 60 seconds until fragrant. Add the cream of mushroom soup and sour cream, then pour in the chicken broth. Stir everything together until the mixture is smooth and fully combined. Taste and adjust the seasoning — it should be well-seasoned at this stage, because the rice is going to absorb a lot of that flavour as it cooks.
Pro Tip: If you’re adding optional ingredients like diced bell pepper, mushrooms, or cream cheese, stir them in now while the base is still on the stove. This is the easiest point in the process to incorporate extra flavour without disrupting the layering later.
Step 4: Layer the Casserole Dish
Preheat your oven to 375°F (190°C). Lightly grease a 9×13-inch baking dish with oil or non-stick spray. Pour the uncooked rice evenly across the bottom of the dish — spread it into an even layer with a spatula. Ladle the creamy broth mixture over the rice and stir gently to distribute it. Nestle the seared chicken pieces on top of the rice mixture in a single layer, pressing them in slightly so they sit partially submerged in the liquid. Scatter the thawed vegetables evenly across the top.
Pro Tip: Make sure the rice is fully submerged in liquid before it goes into the oven. Any dry rice sitting on the surface won’t cook through properly. If the liquid doesn’t quite cover everything, add an extra splash of chicken broth before sealing with foil.
Step 5: Cover and Bake Low and Slow
Cover the baking dish tightly with aluminium foil — this is non-negotiable. The foil traps the steam inside the dish, which is what cooks the rice and keeps the chicken moist throughout the bake. Bake covered at 375°F for 35 minutes. At the 35-minute mark, remove the foil and check the rice by pushing a spoon into the centre of the dish. The rice should be nearly tender and most of the liquid should be absorbed. If it still looks quite wet, re-cover and bake for another 10 minutes before checking again.
Pro Tip: Every oven behaves slightly differently. If your oven runs hot, check the casserole at the 30-minute mark. If it runs cool, it may need an extra 10–15 minutes total. The rice texture is your guide — not the timer.
Step 6: Add Cheese, Finish, and Serve
Scatter the remaining shredded cheddar cheese evenly over the top of the uncovered casserole. Return the dish to the oven, uncovered, for another 10–12 minutes until the cheese is melted, bubbling, and starting to turn golden at the edges. Remove from the oven and let the chicken rice casserole rest for 5 minutes before serving — this allows the sauce to settle and thicken slightly, and prevents burning the roof of your mouth on the first bite. Top with fresh parsley, crispy fried onions, or an extra crack of black pepper before bringing it to the table.
Pro Tip: For a deeper golden cheese crust, switch your oven to the broil setting for the final 2–3 minutes. Watch it closely — it goes from golden to burnt faster than you’d expect.
Cook Time
Total Time: 55–60 minutes | Prep: 15 minutes | Sear & Sauté: 10 minutes | Bake: 45–50 minutes
One skillet, one baking dish — dinner done with minimal cleanup.
Servings
Serves 6 generous portions from a standard 9×13-inch baking dish.
Nutritional Information (approx. per serving)
| Nutrient | Amount |
|---|---|
| Calories | 520 kcal |
| Fat | 18g |
| Saturated Fat | 8g |
| Carbohydrates | 48g |
| Protein | 38g |
| Sugar | 4g |
| Fiber | 2g |
| Sodium | 580mg |
| Vitamin C | 8mg |
| Potassium | 620mg |
| Calcium | 210mg |
Values are approximate and will vary based on ingredients used.
Storage Instructions
Chicken rice casserole is one of the best make-ahead and leftover meals you can have in your kitchen. Once the casserole has cooled to room temperature — which takes about 30 minutes — transfer portions into airtight containers and refrigerate for up to 4 days. The flavours actually deepen overnight, which makes leftovers genuinely worth looking forward to. When reheating, add a splash of chicken broth or water over the portion before warming it in the microwave or in a covered pan over medium-low heat — the rice absorbs moisture as it sits and needs that extra liquid to loosen back up. Stir halfway through reheating to distribute the heat evenly. For freezing, chicken rice casserole freezes exceptionally well. Portion it into individual freezer-safe containers or bags, press out any excess air, and freeze for up to 3 months. To reheat from frozen, thaw overnight in the refrigerator, then warm gently with a splash of broth either in the microwave or in an oven-safe dish covered with foil at 350°F until heated through. Avoid freezing portions that have already been reheated once — cook fresh from the freezer for the best and safest result.
📖 Read More: bang bang chicken
Suggestions
- Broccoli Cheddar Version: Stir 2 cups of small broccoli florets into the broth mixture before layering the casserole. The broccoli softens perfectly during the bake and pairs with the cheddar topping in a way that makes every bite feel like a complete meal. It’s one of the most satisfying ways to get vegetables into a dish without anyone picking around them.
- Dairy-Free Build: Replace the sour cream with full-fat coconut cream and use a dairy-free cream of mushroom soup — several good options are available in most grocery stores now. Skip the cheddar topping or use a shredded dairy-free cheese alternative. The casserole loses none of its creaminess and works well for households managing lactose intolerance or plant-based diets.
- High-Protein Meal Prep Version: Use 2 lbs of chicken thighs instead of breast, double the protein per portion, and swap in cauliflower rice for half of the white rice. Portion into six individual containers immediately after resting and refrigerate for the week ahead. Each portion reheats in under 3 minutes and delivers a high-protein, moderate-carb lunch that holds you through the afternoon.
- Spicy Southwest Twist: Add 1 can of drained black beans, 1 cup of frozen corn, 1 teaspoon of cumin, and half a teaspoon of cayenne to the broth base. Top with pepper jack cheese instead of cheddar and finish with sliced jalapeños after baking. This version of chicken rice casserole has bold, smoky flavour and works especially well served with a dollop of sour cream and a squeeze of lime.
- Kid-Friendly Mild Version: Skip the smoked paprika and garlic powder, use cream of chicken soup instead of mushroom, and stick to frozen peas as the only vegetable — kids tend to tolerate them better than mixed options. Cut the chicken into smaller pieces before nestling them into the dish so little ones can serve themselves easily. A mild version of this casserole tends to become a weekly request very quickly.
- Brown Rice Option: Brown rice works well in this casserole but requires one adjustment — increase the chicken broth by ½ cup and extend the covered baking time to 55–60 minutes before uncovering for the cheese. Brown rice adds a nuttier flavour, more fibre, and a slightly chewy texture that holds up beautifully against the creamy sauce.
- Mushroom and Herb Elevated Version: Add 1½ cups of sliced cremini mushrooms to the sauté step alongside the onion, and swap the dried thyme for fresh thyme and a sprig of rosemary. Use Gruyère or a sharp white cheddar in place of regular cheddar for the topping. This version of chicken rice casserole tastes significantly more complex — the kind of dish you’d serve without hesitation at a dinner party.
- Weight-Loss Friendly Option: Use Greek yogurt in place of sour cream, reduce the cheese topping to ¼ cup, and replace half the rice with riced cauliflower. Choose a low-sodium cream of mushroom soup to keep the sodium in check. The result is a lighter casserole that still hits every comfort-food note without the calorie load of the original.
Seasonal Relevance
Chicken rice casserole is naturally a cool-weather dish — it’s the kind of meal that makes sense from October through March when the oven is a welcome source of heat and a bubbling baking dish on the table is genuinely comforting. During autumn and winter, lean into root vegetables like diced parsnip, carrot, and sweet potato stirred into the broth base for seasonal depth and natural sweetness. From April through June, lighten the casserole by adding fresh asparagus tips or spring peas in the final layering step — they stay bright and tender if added after the foil comes off. In peak summer, when turning the oven on for an hour feels like a commitment, make the casserole early in the morning or the evening before and simply reheat portions throughout the week. Fresh herbs like parsley, chives, and tarragon are at their peak in summer and make excellent garnishes that lift the finished dish considerably.
Conclusion
Chicken rice casserole earns its place as a weeknight staple because it asks very little of you and gives back a lot — a full, satisfying, one-dish dinner that the whole table finishes without leaving anything behind. The base recipe is reliable and straightforward, but the variations are where it really starts to get interesting. Once you’ve made it once and understand how the components work together, you’ll start making it yours — switching cheeses, adding vegetables, adjusting the seasoning to match the season. That’s exactly what a great recipe should do. Make your first chicken rice casserole this week, taste it, adjust it, and then make it again. It only gets better from there.
FAQs
Q: Do I need to pre-cook the rice before adding it to the casserole?
No — that’s one of the main advantages of this method. The uncooked rice absorbs the seasoned broth and cream soup mixture as it bakes, which means it’s fully flavoured from the inside rather than just coated on the outside. The key is making sure the rice is fully submerged in liquid before the foil goes on. Pre-cooked rice will turn mushy by the time the chicken is done, so always start with dry, uncooked rice.
Q: My rice came out undercooked — what went wrong?
The most common causes are too little liquid, foil that wasn’t sealed tightly enough, or an oven that runs cool. Make sure your broth-to-rice ratio follows the recipe exactly, that the foil is pressed firmly against the edges of the dish to trap steam, and that your oven is fully preheated before the casserole goes in. If the rice is still firm when you check at 35 minutes, re-seal the foil and bake for another 10–15 minutes before uncovering for the cheese.
Q: Can I use rotisserie chicken instead of raw chicken?
Yes, and it’s a great shortcut. Shred the rotisserie chicken and skip the searing step entirely. Reduce the bake time by about 10 minutes since you don’t need to worry about cooking raw chicken through — you’re just warming it and cooking the rice. Stir the shredded chicken into the broth base before layering, or nestle it in just like the recipe calls for. The flavour is slightly different but still very satisfying.
Q: Can I make chicken rice casserole ahead of time?
Absolutely. Assemble the casserole fully — rice, broth base, seared chicken, and vegetables — cover tightly with foil, and refrigerate for up to 24 hours before baking. When you’re ready to cook, add 10 extra minutes to the covered bake time since the dish is going in cold. Hold off on adding the cheese topping until the final uncovered stage of baking so it melts fresh rather than sitting and drying out in the fridge overnight.
Q: Is this recipe suitable for weight loss?
With a few smart swaps, yes. Replace the sour cream with low-fat Greek yogurt, use a light cream of mushroom soup, reduce the cheese topping to a small amount for flavour rather than coverage, and substitute half the white rice with riced cauliflower. These changes drop the calorie count by over 150 per serving while keeping the casserole filling, high in protein, and genuinely satisfying — not diet food in disguise.
Q: What can I use instead of cream of mushroom soup?
Cream of chicken soup is the most direct substitute and produces a milder, slightly sweeter base. If you’d rather avoid canned soups entirely, make a quick homemade version: melt 2 tablespoons of butter, whisk in 2 tablespoons of flour, then slowly add 1 cup of chicken broth and ½ cup of milk, stirring until thickened. Season with salt, pepper, and a pinch of thyme. It takes about 5 minutes and works identically to the canned version in the casserole.
Q: How do I keep the chicken from drying out in the casserole?
Two things prevent dry chicken in this recipe: searing it first to lock in moisture, and keeping the foil tightly sealed for the majority of the bake time. Chicken thighs are also significantly more forgiving than breasts — they have higher fat content and stay juicy even if the oven runs a little hot or the bake time runs slightly long. If you consistently find the chicken dries out, switch to thighs and reduce the oven temperature to 350°F for a longer, slower bake.