Nachos With Ground Beef Bold, Cheesy & Ready in 25 Minutes
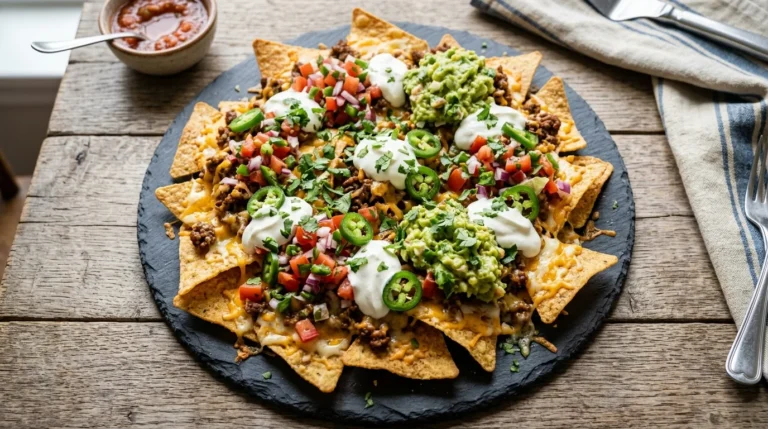
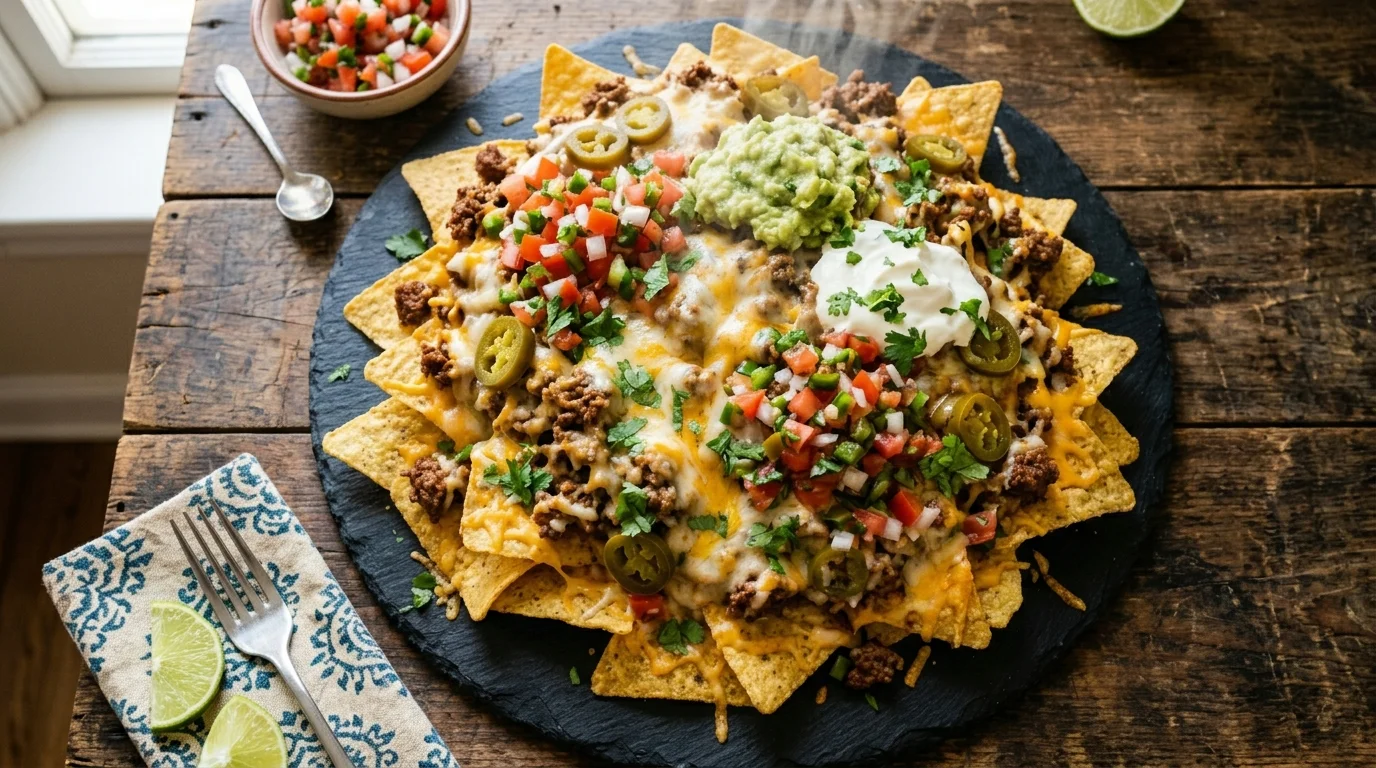
Nachos with ground beef are the weeknight dinner and party dish that never needs a special occasion to justify making. Thick, crispy tortilla chips layered with boldly seasoned ground beef, melted cheddar and Monterey Jack, black beans, jalapeños, and finished with cold sour cream, pico de gallo, and fresh guacamole — this is a nacho build that is complete, genuinely satisfying, and ready from the oven in under 30 minutes.
The ground beef is the key properly seasoned, well-browned, and built with enough spice and sauce to hold its own against everything piled around and on top of it. Whether you’re feeding a hungry group on game day, building a fast Friday dinner, or setting up a nacho tray that earns its reputation at a party, nachos with ground beef deliver every single time. No complicated steps — just pure nacho satisfaction, hot from the oven and ready to dig into.
Ingredients
For the Seasoned Ground Beef:
- 450g (1 lb) ground beef [80/20 for the best flavour and browning]
- 1 medium yellow onion, finely diced
- 3 cloves garlic, minced
- 1 tbsp olive oil
- 1½ tsp chili powder
- 1 tsp cumin
- 1 tsp smoked paprika
- ½ tsp garlic powder
- ½ tsp onion powder
- ½ tsp fine salt
- ¼ tsp black pepper
- ¼ tsp cayenne pepper [optional — adjust to heat preference]
- 1 tbsp tomato paste
- 2 tbsp water or beef broth
- 1 tsp Worcestershire sauce
For the Nacho Base:
- 250g (9 oz) thick-cut restaurant-style tortilla chips [restaurant-style, never thin]
- 1½ cups shredded sharp cheddar cheese
- 1 cup shredded Monterey Jack cheese
For the Baked Toppings:
- 1 can (15 oz) black beans, drained and rinsed
- ½ cup frozen or canned corn, drained and dried
- ½ cup pickled jalapeños [or fresh, sliced]
- ¼ cup red onion, finely diced
- ½ cup cherry tomatoes, quartered
For the Cold Toppings — Added After Baking:
- ½ cup sour cream [or plain Greek yogurt]
- ½ cup fresh pico de gallo or salsa
- 1 ripe avocado, diced [or ½ cup guacamole]
- ¼ cup fresh cilantro, roughly chopped
- Juice of 1 lime
- Hot sauce, for serving
- Extra pickled jalapeños, for serving
Optional Add-Ins:
- ¼ cup sliced black olives (optional)
- 2 tbsp chipotle mayo, drizzled (optional)
- Crumbled cotija cheese, for finishing (optional)
- 4 strips crispy bacon, crumbled into the beef (optional)
- ½ cup shredded pepper jack — for extra heat (optional)
Step-by-Step Instructions
Step 1: Gather and Prep Your Ingredients
Before the skillet goes on, prep everything and stage it at the counter. Dice the onion, mince the garlic, drain and dry the beans and corn, quarter the tomatoes, and combine the two cheeses in a single bowl. Have all cold toppings — sour cream, avocado, pico de gallo, cilantro — prepped and ready in individual bowls before the chips go on the baking sheet. Nachos with ground beef are a fast, momentum-driven cook — from the moment the beef goes in the pan, everything moves quickly, and having every component staged before cooking begins is what produces a clean, well-built nacho rather than a rushed one assembled while things are still cooking elsewhere.
Pro Tip: Pat the corn dry with paper towels before adding it to the nacho layers — wet corn releases steam in the oven and softens the chips beneath it. The same applies to drained black beans — shake the colander well and press a paper towel across the beans before using. Dry toppings on dry chips before baking is the most effective single habit for consistently crispy nachos with ground beef.
Step 2: Brown and Season the Ground Beef
Heat 1 tablespoon of olive oil in a large skillet over medium-high heat. Add the diced onion and cook for 3 minutes until softened. Add the ground beef and break it apart immediately — spread across the full surface and leave undisturbed for 2 minutes so the base can brown before being broken up further. Cook for 6–8 minutes total, breaking into small pieces, until no pink remains and the edges have some golden-brown colour. Drain the excess fat, leaving approximately 1 tablespoon in the pan. Add the minced garlic and stir for 60 seconds, then add the tomato paste and cook for another 60 seconds — letting it caramelise against the hot beef before any liquid touches it. Add all the spices, Worcestershire sauce, and broth. Stir to coat every piece of beef and simmer for 2 minutes until the liquid is mostly absorbed and the seasoning clings to the meat.
Pro Tip: The tomato paste must caramelise directly against the hot pan for 60 seconds before the broth or spices go in. This step adds a savoury depth to the nachos with ground beef that transforms the meat from well-seasoned to genuinely bold and complex. Skip it and the beef tastes flat by comparison — do it and every layer of the finished nacho benefits from a beef that carries real flavour all the way through.
Step 3: Build the First Chip and Beef Layer
Preheat the oven to 400°F (200°C) and line a large rimmed baking sheet with aluminium foil. Spread half the tortilla chips in a single, even layer across the entire sheet — flat, not stacked, with every chip visible and as much surface as possible exposed. Distribute half the seasoned ground beef evenly across the chips — aim for coverage across the whole tray rather than piling in the centre. Scatter half the black beans, corn, red onion, tomatoes, and jalapeños across the beef layer. Sprinkle half the combined shredded cheese evenly across every topping — this cheese layer is what bonds the first layer to the second and holds the nachos with ground beef together as a cohesive build rather than a loose pile of toppings.
Pro Tip: Use a large enough baking sheet that the chips form a single, flat layer without stacking more than two chips deep in any area. Chips buried three or four layers deep never crisp during baking — they steam under the weight above them and produce the soggy bottom layer that ruins nachos from the first bite. A wider, flatter build always produces better nachos than a tall, stacked one.
📖 Read More: Chicken Nachos
Step 4: Build the Second Layer and Final Cheese Topping
Add the remaining tortilla chips directly over the first layer — spread them evenly without pressing the first layer down. Distribute the remaining ground beef, beans, corn, red onion, tomatoes, and jalapeños across the second chip layer. Finish with the remaining combined cheese scattered generously across the entire surface — every chip should have at least partial cheese coverage, and the topping should be generous enough to look almost too much before it goes in the oven. It won’t be. Add any optional extras — crumbled bacon, extra jalapeños, pepper jack cheese — directly on this top layer where they get the most heat exposure and develop the most colour during baking.
Pro Tip: Mix the cheddar and Monterey Jack together into a combined bowl before scattering across any layer — applying them pre-mixed ensures every handful has the flavour of both cheeses rather than patches of pure cheddar alternating with patches of pure Monterey Jack. The combined melt of the two cheeses together produces a noticeably more even, more visually appealing cheese layer than the two applied separately at any point in the build.
Step 5: Bake Until Bubbling and Golden
Bake the assembled nachos with ground beef uncovered at 400°F for 8–10 minutes — check at 7 minutes because the margin between perfectly melted and overdone chips is narrow. The cheese should be completely melted and visibly bubbling across the entire surface, with golden-brown patches developing particularly over the beef and bean toppings. The chip edges should look noticeably more golden than before baking. For a deeper golden cheese finish, switch the oven to broil for the final 90 seconds and watch continuously — a broiler moves fast and chips can go from golden to burnt in under 60 seconds. Remove the moment the cheese colour and bubble level is exactly right and carry-over heat will finish it from there.
Pro Tip: Bake on the middle rack of the oven rather than the bottom or top. The middle rack provides even heat circulation from both above and below simultaneously — chips crisp from bottom heat while cheese melts from top heat. Bottom rack concentrates heat beneath the chips and can burn the base before the cheese melts. Top rack melts the cheese but doesn’t give the chips adequate heat to crisp from below.
Step 6: Add Cold Toppings and Serve Immediately
The moment the nachos with ground beef come out of the oven, add every cold topping immediately while the cheese is still bubbling. Drop sour cream in spoonfuls into the gaps between chips — don’t spread it, which smears and loses its visual appeal. Add the diced avocado or guacamole in clusters across the tray, spoon the pico de gallo or salsa across the surface, scatter fresh cilantro generously over everything, and add extra jalapeños for anyone who wants more heat. Squeeze the lime across the entire tray just before serving — the hit of fresh acid over the hot, cheesy beef nachos brings every flavour into sharp focus and is the step that makes the whole build taste complete. Serve straight from the sheet pan, immediately.
Pro Tip: Score through the cheese topping with kitchen scissors or a sharp knife into portion-sized sections before the serving spatula goes in. Cutting through the melted cheese layer first means each portion lifts cleanly with an intact cheese top rather than dragging and tearing the surface across adjacent chips as the serving utensil moves. One set of cuts before serving takes 10 seconds and makes every portion look deliberate and clean on the plate.
Cook Time
Total Time: 25 minutes | Prep: 10 minutes | Cook Beef: 10 minutes | Build and Bake: 10 minutes One skillet, one sheet pan — nachos with ground beef ready in 25 minutes.
Servings
Serves 4 as a main course or 6–8 as a party appetiser.
Nutritional Information (approx. per serving — based on 4 main course servings, with all cold toppings)
| Nutrient | Amount |
|---|---|
| Calories | 710 kcal |
| Fat | 42g |
| Saturated Fat | 17g |
| Carbohydrates | 52g |
| Protein | 36g |
| Sugar | 5g |
| Fiber | 8g |
| Sodium | 940mg |
| Vitamin C | 16mg |
| Potassium | 680mg |
| Calcium | 440mg |
Values are approximate and will vary based on chip brand, cheese quantity, and toppings used.
Storage Instructions
Nachos with ground beef are built to be eaten immediately — assembled, baked nachos do not store well as a completed dish. The chips soften from the moisture of the toppings within 20–30 minutes of baking and there is no effective method for reviving assembled nachos once they’ve softened. The practical storage approach is to keep the components completely separate. The seasoned ground beef stores in an airtight container in the refrigerator for up to 4 days and reheats in a skillet with a splash of broth in under 3 minutes — it works equally well in tacos, burritos, rice bowls, and quesadillas throughout the week from the same batch. The shredded cheese blend keeps in a sealed bag in the refrigerator for up to 1 week. Drained black beans and corn keep covered for up to 3 days. Diced avocado keeps for up to 24 hours with lime juice and plastic wrap pressed against the surface. Pico de gallo keeps refrigerated for up to 2 days — drain any excess liquid before serving as leftovers. For a gathering, the two-batch baking approach produces consistently better results than one large tray assembled early — build and bake the first tray as guests arrive, and build and bake the second tray 15–20 minutes later. Two fresh, hot trays of nachos with ground beef served in sequence consistently outperform one large tray that softens progressively on a table while people graze across 45 minutes.
📖 Read More: Loaded Nachos
Suggestions
- Spicy Ground Beef Nachos: Increase the cayenne to ½ teaspoon and add ½ teaspoon of chipotle powder to the beef spice blend. Add 1 tablespoon of minced chipotle peppers in adobo sauce to the beef during the final simmer. Replace the Monterey Jack with pepper jack cheese in the topping layer. This version of nachos with ground beef has a slow-building, smoky heat that amplifies rather than overpowers the other flavours — the chipotle depth is particularly effective at making the beef taste richer and more complex at the same time as adding heat.
- Queso Ground Beef Nachos: Make a quick white queso by melting 200g of white American cheese with ¼ cup of whole milk and 1 tablespoon of pickled jalapeño brine over low heat until completely smooth. Pour the queso across each chip layer in place of shredded cheese. The queso coats every chip, bean, and piece of beef uniformly — no bare patches, no thick clumps — and produces a creamy, flowing cheese layer that looks and tastes like a restaurant nacho build rather than a home version.
- BBQ Ground Beef Nachos: Replace the Tex-Mex spice blend with 1 teaspoon of smoked paprika, 1 teaspoon of garlic powder, and 3 tablespoons of your favourite BBQ sauce stirred into the beef during the final simmer. The BBQ sauce caramelises slightly in the pan and coats the beef in a sticky, smoky glaze. Use sharp cheddar only for the cheese topping. Finish the baked nachos with a drizzle of extra BBQ sauce across the cold toppings rather than salsa. This is the most universally crowd-pleasing variation in the list — sweet, smoky, and familiar enough for every palate.
- Beef Nacho Bar: Bake the nachos with only the beef, cheese, beans, corn, and jalapeños — no fresh toppings on the tray. Set out 8–10 topping options in individual small bowls at the table: sour cream, guacamole, salsa, hot sauce, chipotle mayo, sliced jalapeños, diced red onion, cotija cheese, cilantro, and lime wedges. Each person builds their own portion from the tray. The nacho bar format is the most practical for parties with mixed dietary preferences — it removes every topping objection from the equation and lets each person build exactly the nachos with ground beef they want.
- Southwest Ground Beef Nachos: Add 1 cup of roasted red bell pepper strips and ½ cup of diced green chiles — both patted dry — to the baked topping layers alongside the standard beans and corn. Replace the standard pico de gallo with a mango salsa — diced mango, red onion, jalapeño, cilantro, and lime juice. The sweet mango against the spiced beef and the roasted pepper creates a Southwestern flavour combination that is lighter and more fruit-forward than the classic build while still delivering fully on the nacho promise.
- Breakfast Nachos With Ground Beef: Use the seasoned ground beef alongside scrambled eggs cooked with diced onion and bell pepper as the protein layer instead of beef alone. Reduce the beef quantity to 200g and add 4 scrambled eggs distributed through the layers. Replace the jalapeño toppings with mild green chiles. Top the baked nachos with sour cream, pico de gallo, sliced avocado, and a drizzle of hot sauce. Breakfast nachos with ground beef are the most unexpected format in this list and the most reliably impressive at a weekend brunch.
- Vegetarian Version: Remove the ground beef entirely and replace it with a seasoned bean and sweet potato mixture — dice 1 medium sweet potato into small cubes, toss with the full spice blend and olive oil, and roast at 400°F for 20 minutes until caramelised. Combine with the black beans and distribute across the nacho layers exactly as the beef would be applied. The roasted sweet potato provides the substance, natural sweetness, and seasoning absorption that ground beef provides in the original — the result is a fully satisfying vegetarian nacho that requires no apology or explanation.
- Weight-Loss Friendly Ground Beef Nachos: Use 90/10 extra-lean ground beef and drain very thoroughly. Use baked tortilla chips instead of fried to reduce the base fat content. Reduce the total cheese to 1½ cups across both layers. Replace sour cream with plain low-fat Greek yogurt. Skip the guacamole or use half an avocado instead of a full one. Load generously with beans, corn, and fresh toppings — the volume from the vegetables and the protein from the lean beef keep the portion filling. Each main course serving comes in under 520 calories on this build with over 30g of protein.
Seasonal Relevance
Nachos with ground beef work in every season but earn their biggest audiences at specific calendar moments. From September through January, game day culture makes nachos the default group food — football watching parties, playoff weekends, and Super Bowl gatherings all centre on the nacho tray in a way that no other dish matches. The spicy version, the BBQ build, and the queso variation all suit this season best — bold, indulgent, and appropriate for the cold-weather appetite for richer food. From May through August, nachos with ground beef transition to backyard gatherings, pool parties, and casual outdoor meals where something shareable, hands-on, and fast is the most practical format available. Summer is when the fresh toppings make the biggest flavour difference — peak-season tomatoes, ripe avocados, and fresh-squeezed lime make the cold topping layer significantly better than the same ingredients in winter months. Spring, March through May, is when the nacho bar format gets most use — entertaining resumes, groups reassemble, and the customisable format accommodates the mixed dietary requirements of early-season gatherings far better than any single, preset dish.
Conclusion
Nachos with ground beef earn their permanent place in the food rotation because they combine everything a great dish should deliver — bold flavour, satisfying substance, visual impact, and a format that makes eating genuinely social and interactive. The two-layer build, the bold seasoned beef, the combined cheese melt, and the cold toppings added immediately from the oven — every element contributes to a nacho that is better than most restaurant versions and built in under 30 minutes at home. Get the beef properly browned and seasoned, use thick chips, apply two layers of everything, and serve the moment the cold toppings go on. Work through the variations — the spicy chipotle build, the BBQ version, the queso method — and find the nachos with ground beef that your table requests by name. Every version clears the tray, every time.
FAQs
Q: What is the best ground beef fat ratio for nachos? 80/20 ground beef is the best choice for nachos with ground beef. The 20% fat content produces more browning and more flavour during the sear than leaner options — the fat renders into the pan and bastes the beef as it cooks, contributing richness that leaner ground beef simply can’t replicate. Draining the excess fat after browning gives you all the flavour benefit of the fat during cooking and the cleaner finished result of having removed most of it before the spices go in. 90/10 lean ground beef works as a lower-calorie alternative but needs added olive oil and extra Worcestershire sauce to compensate for the reduced flavour that the missing fat would otherwise provide.
Q: How do I prevent nachos with ground beef from getting soggy? Four things prevent soggy nachos — using thick-cut restaurant-style chips rather than thin ones, drying all wet toppings before adding them to the layers, baking uncovered so steam escapes rather than softening the chips, and serving within 5 minutes of adding the cold toppings. Drain beans and corn completely and pat dry. Never add salsa, pico de gallo, sour cream, or avocado before baking — all wet toppings go on after the oven. The two-layer build also helps — chips on the bottom of a single heavy layer have more weight and moisture bearing down on them than chips in a properly distributed two-layer build.
Q: Can I make the ground beef ahead of time for nachos? Yes — and it’s one of the best aspects of nachos with ground beef as a regular recipe. The seasoned ground beef can be made up to 3 days in advance and stored in an airtight container in the refrigerator. Reheat in a skillet with a splash of broth over medium heat for 2–3 minutes until warm and glossy. The beef actually tastes slightly better after 24 hours in the refrigerator — the spices continue to develop into the meat and produce a more rounded, deeper flavour than freshly cooked beef. Prep the beef Sunday, refrigerate, and nachos on any subsequent day take under 15 minutes from counter to oven.