
Banana Bread Recipe Moist, Tender & Ready in 1 Hour
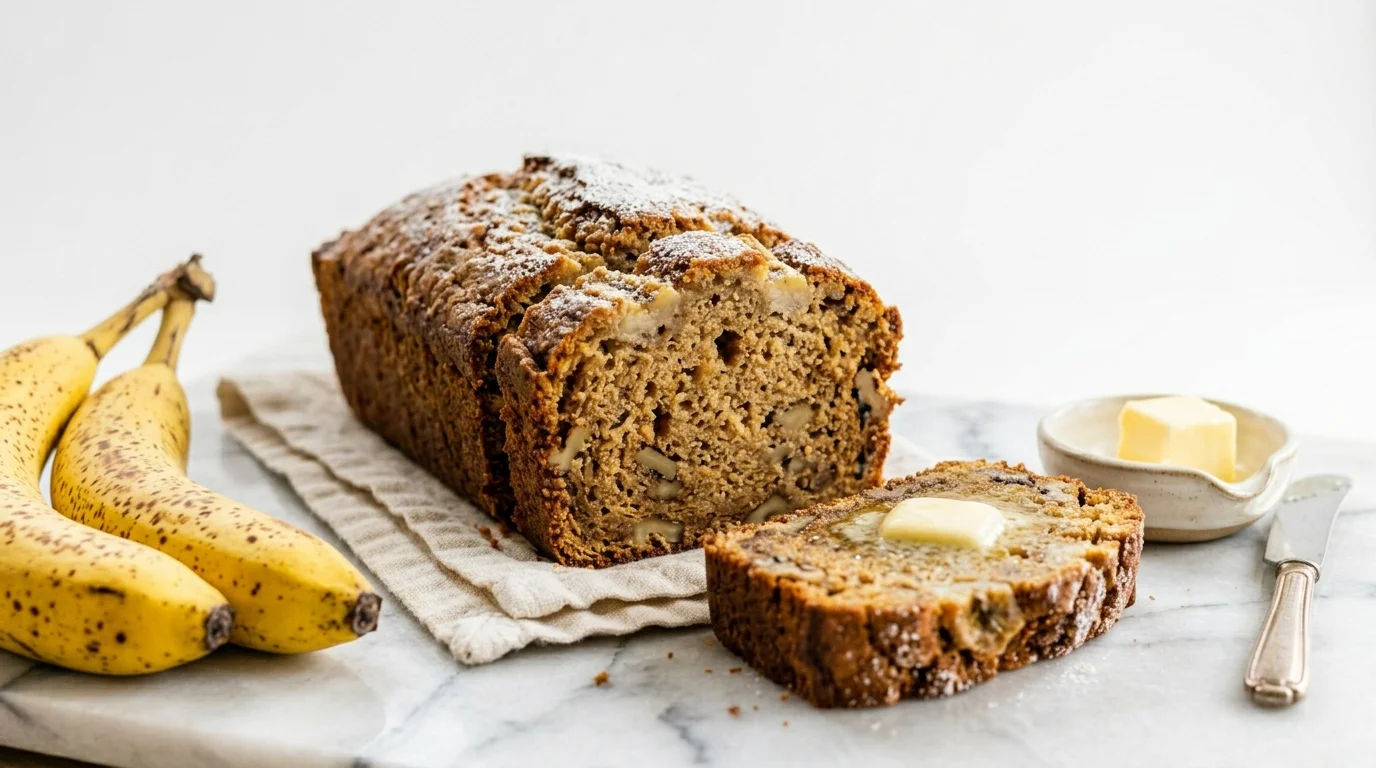
A banana bread recipe that actually delivers — moist all the way through, deeply banana-flavoured, with a golden crust and a tender crumb that holds together cleanly when sliced — is one of the most valuable things in a home baker’s collection.
It’s the recipe that uses the bananas everyone forgets on the counter, the one that fills the kitchen with the kind of smell that makes everyone appear from another room, and the one that disappears from the cooling rack faster than most baked goods that take twice as long to make. It works as a breakfast, an afternoon snack, a dessert that requires no apology, and a gift that is genuinely appreciated rather than politely received. No complicated steps — just pure banana bread recipe satisfaction, golden and fragrant from the oven in one hour.
Ingredients
For the Banana Bread Batter (makes one 9×5-inch loaf):
- 3 large overripe bananas [approximately 1½ cups mashed — the riper the better]
- 1¾ cups (210g) all-purpose flour
- 1 tsp baking soda [not baking powder — baking soda is correct here]
- ½ tsp fine salt
- ½ tsp ground cinnamon
- ½ cup (115g) unsalted butter, melted and slightly cooled
- ¾ cup (150g) granulated sugar [or brown sugar for deeper flavour]
- 2 large eggs, room temperature
- ¼ cup (60g) plain Greek yogurt or sour cream [the moisture secret]
- 1 tsp pure vanilla extract
- 2 tbsp whole milk [optional — only if batter looks too thick]
Optional Mix-Ins:
- ½ cup walnuts or pecans, roughly chopped (optional)
- ½ cup chocolate chips — semi-sweet or dark (optional)
- ¼ cup shredded coconut (optional)
- 1 tbsp espresso powder — intensifies the banana flavour (optional)
- ½ tsp ground nutmeg — warm spice accent (optional)
For Finishing:
- 1 tbsp granulated sugar or turbinado sugar [sprinkled on top before baking — creates a crunchy crust]
- 2 banana halves, placed on top before baking (optional — for presentation)
Step-by-Step Instructions
Step 1: Gather and Prep Your Ingredients
Pull every ingredient out before you begin and bring the eggs and butter to room temperature — cold eggs added to melted butter can cause the fat to solidify into small clumps that never fully incorporate, producing uneven batter and greasy pockets in the finished loaf. Mash the bananas in a bowl with a fork until completely smooth with no large chunks remaining — a few small lumps are acceptable but large banana pieces create wet, dense pockets in the crumb rather than the uniform, moist texture a good banana bread recipe produces. Measure every dry ingredient separately into a bowl before mixing begins. Grease a 9×5-inch loaf pan thoroughly with butter or cooking spray and line the base with a parchment strip with an overhang on both long sides for clean lifting.
Pro Tip: The ripeness of the bananas is the most important variable in any banana bread recipe — bar none. Bananas with fully black skins have the highest natural sugar content, the strongest banana flavour, and the most moisture of any stage of ripeness. Yellow bananas with a few brown spots will produce a pleasant loaf. Fully black bananas produce something genuinely outstanding. If your bananas aren’t ripe enough, place unpeeled bananas on a baking sheet at 300°F for 15–20 minutes until the skins turn black — the heat accelerates the ripening process and produces mash that behaves like naturally overripe banana.
Step 2: Mix the Wet Ingredients
In a large bowl, whisk together the melted butter and sugar until combined. Add the eggs one at a time, whisking well after each addition. Add the mashed banana, Greek yogurt, and vanilla extract and whisk until completely smooth and uniform — the mixture should look thick, slightly glossy, and uniformly yellow-brown from the banana. The Greek yogurt is the ingredient that separates an average banana bread recipe from a great one — it adds fat, acid, and moisture simultaneously, producing a crumb that stays tender for days longer than a loaf made without it. Sour cream works identically. Neither can be replaced with milk or water without a noticeable drop in the final texture quality.
Pro Tip: Don’t use an electric mixer for banana bread at any stage — a whisk and a spatula is all the equipment this recipe needs. An electric mixer overdevelops the gluten in the flour during the combined mixing stage and produces a tough, rubbery loaf rather than the tender, soft crumb that makes banana bread worth baking. Mix by hand, mix gently, and stop the moment the flour streaks disappear.
Step 3: Combine the Dry Ingredients and Make the Batter
In a separate bowl, whisk together the flour, baking soda, salt, cinnamon, and any dry optional additions — espresso powder, nutmeg — until fully combined and no pockets of unmixed baking soda remain. Pour the dry ingredients over the wet ingredients in one addition and fold with a spatula using broad, gentle strokes from the bottom of the bowl upward. Stop folding the moment the flour streaks disappear — 10–12 folds is typically sufficient. If adding walnuts, chocolate chips, or other mix-ins, fold them in with the final 2–3 strokes rather than mixing them through separately. The batter will look thick, slightly lumpy from the banana, and dense — this is correct and exactly what a properly made banana bread batter should look like before it goes into the pan.
Pro Tip: Toss any mix-ins — nuts, chocolate chips, dried fruit — in 1 teaspoon of flour before folding them into the batter. The thin flour coating prevents them from sinking to the bottom of the loaf during baking by giving them a slightly rougher surface that grips the surrounding batter. Without the flour coating, dense add-ins sink through the wet batter during the long bake time and collect in a single layer at the base of the loaf.
📖 Read More: Focaccia Bread Recipes
Step 4: Pan, Top, and Prepare for Baking
Preheat the oven to 350°F (175°C) with the rack positioned in the centre of the oven. Pour the batter into the prepared loaf pan and smooth the top with a spatula — a smooth, level surface produces a more even rise than a rough, uneven one. If using halved bananas for decoration, press them gently into the surface now before the sugar goes on. Sprinkle the tablespoon of granulated or turbinado sugar evenly across the entire top surface — this sugar layer bakes into the characteristic crackled, slightly crunchy crust that distinguishes a properly finished banana bread recipe from a plain loaf. The sugar also helps the surface split along the centre during baking, which is the signature appearance of a well-risen banana bread loaf.
Pro Tip: For the most pronounced centre split — the crack that runs the length of the loaf — run a thin line of cold butter or a drizzle of oil along the very centre of the batter just before the pan goes into the oven. This line of fat prevents the surface from setting too quickly and allows the rising batter to split naturally along that exact line as it expands upward in the oven.
Step 5: Bake Low and Slow
Bake at 350°F for 55–65 minutes. Banana bread requires a long, moderate bake — the high moisture content from the overripe bananas and the yogurt means the interior takes significantly longer to set than a standard cake batter. Do not open the oven before the 45-minute mark — cold air from opening the door too early can cause the loaf to sink in the centre as the rising structure collapses before it has set. At 55 minutes, insert a toothpick or thin skewer into the thickest part of the loaf — it should come out with a few moist crumbs but no wet batter. A perfectly clean toothpick often means the loaf is slightly overbaked — moist crumbs are the target, not dry crumbs and not wet batter.
Pro Tip: Tent the loaf loosely with aluminium foil at the 35–40 minute mark if the top is browning faster than expected. The foil reflects the oven heat and slows surface browning without affecting the internal bake — the interior continues cooking at the correct rate while the crust colour holds at a golden rather than dark brown. Remove the foil for the final 10 minutes to allow the sugar-crusted top to set and develop its characteristic texture.
Step 6: Cool Completely Before Slicing
Remove the baked loaf from the oven and let it rest in the pan for exactly 10 minutes — the structure needs time to set before it can survive being lifted out. Remove from the pan using the parchment overhang and transfer to a wire rack to cool completely — at minimum 1 hour, ideally 90 minutes. Cutting into warm banana bread releases the steam that is still redistributing through the crumb and produces a gummy, wet interior rather than the clean, moist slice of a properly cooled loaf. The temptation to slice immediately is understandable but consistently produces disappointing results. Wait the full hour and the first slice will be everything a great banana bread recipe should deliver.
Pro Tip: Banana bread tastes even better the day after baking. The moisture from the banana continues to distribute through the crumb overnight and the flavours — vanilla, cinnamon, banana — develop and mellow into a more cohesive, rounded taste than the freshly baked loaf has. If you can manage it, bake the evening before and slice in the morning — the difference in flavour is genuinely worth the wait.
Cook Time
Total Time: 1 hour 20 minutes | Prep: 15 minutes | Bake: 60 minutes | Cool: 90 minutes Active hands-on time: under 15 minutes. The oven does the rest.
Servings
Makes 1 standard 9×5-inch loaf — 10 to 12 slices.
Nutritional Information (approx. per slice — based on 10 slices, plain loaf no mix-ins)
| Nutrient | Amount |
|---|---|
| Calories | 260 kcal |
| Fat | 10g |
| Saturated Fat | 6g |
| Carbohydrates | 38g |
| Protein | 4g |
| Sugar | 20g |
| Fiber | 1g |
| Sodium | 200mg |
| Vitamin C | 3mg |
| Potassium | 160mg |
| Calcium | 25mg |
Values are approximate and will vary based on ingredients and mix-ins used.
Storage Instructions
Banana bread stores better than most baked goods and actively improves in the 24–48 hours after baking as the moisture continues to distribute through the crumb. Store the completely cooled loaf wrapped tightly in plastic wrap at room temperature for up to 4 days — the plastic wrap is essential because exposed banana bread stales and dries out within hours of contact with air. Do not refrigerate banana bread stored for short periods — refrigeration dries the crumb significantly and the loaf goes stale faster at refrigerator temperature than it does wrapped tightly at room temperature. For storage beyond 4 days, slice and freeze. Freezing individual slices is the most practical long-term storage method — wrap each slice tightly in plastic wrap and place in a sealed freezer bag for up to 3 months. Thaw individual slices at room temperature for 30 minutes or toast directly from frozen in a toaster for a warm, slightly crisped result that is genuinely excellent. The whole unsliced loaf also freezes very well — wrap in two layers of plastic wrap followed by foil and freeze for up to 3 months. Thaw overnight at room temperature still wrapped, then bring to serving temperature. Slicing before freezing is the more practical choice since individual slices can be thawed as needed without committing to the whole loaf at once.
📖 Read More: Artisan Bread Recipes
Suggestions
- Chocolate Chip Banana Bread: Fold ¾ cup of semi-sweet chocolate chips into the batter with the final 2–3 folds, and scatter an extra handful across the top surface before the sugar sprinkle goes on. The chocolate chips melt partially during baking and create pockets of soft, slightly bitter chocolate throughout the sweet banana crumb — one of the most universally loved baked goods in any category. Use dark chocolate chips for a less sweet, more complex result that suits adult palates particularly well.
- Banana Walnut Bread: Fold ½ cup of roughly chopped toasted walnuts into the batter after the flour is incorporated. Toast the walnuts in a dry pan for 3–4 minutes over medium heat before chopping — raw walnuts add crunch but toasted walnuts add crunch and a deep, nutty flavour that raw ones simply don’t have. Scatter extra walnut pieces across the top surface before baking for a crunchy, textured crust that distinguishes this version visually and texturally from the plain loaf.
- Banana Bread Muffins: Divide the standard batter evenly among a greased 12-cavity muffin tin — fill each cavity approximately ¾ full. Bake at 375°F for 18–22 minutes until a toothpick comes out with moist crumbs. The higher temperature and smaller volume produces a slightly domed, golden-topped muffin with the same moist, banana-forward crumb as the loaf. Banana bread muffins are the most practical format for meal prep, school lunchboxes, and any occasion where individual portions are more useful than slicing a full loaf.
- Brown Butter Banana Bread: Replace the melted butter with brown butter — cook the butter in a light-coloured pan over medium heat, stirring continuously, until the milk solids turn golden-brown and the butter smells deeply nutty and toasted, approximately 4–5 minutes. Cool slightly before adding to the batter. Brown butter adds a rich, caramel-like depth that transforms the standard banana bread recipe into something noticeably more complex — the nuttiness of the browned milk solids pairs with the banana in a way that regular melted butter simply doesn’t achieve.
- Cream Cheese Swirl Banana Bread: Beat 4 oz of softened cream cheese with 2 tablespoons of sugar and ½ teaspoon of vanilla until smooth. Pour half the banana batter into the prepared pan, dollop the cream cheese mixture across the top, then add the remaining batter. Use a knife or skewer to swirl the cream cheese through the batter with 3–4 figure-eight strokes — don’t over-swirl or the two mixtures merge completely and the visual effect is lost. The cream cheese bakes into tangy, slightly dense ribbons throughout the moist banana crumb that make every slice look and taste genuinely impressive.
- Healthy Banana Bread: Replace ½ cup of the all-purpose flour with whole wheat flour for more fibre and a nuttier flavour. Reduce the sugar to ½ cup and rely on the natural sweetness of very ripe bananas. Replace the butter with ⅓ cup of neutral oil — coconut, avocado, or vegetable — which reduces the saturated fat while maintaining the moist crumb. Add a tablespoon of ground flaxseed for omega-3s. Each slice on this build comes in under 200 calories with noticeably more fibre and a similar level of satisfaction to the full-butter version.
- Banana Bread With Streusel Topping: Make a quick streusel by combining ¼ cup of flour, 3 tablespoons of cold butter cut into small cubes, 3 tablespoons of brown sugar, and ½ teaspoon of cinnamon — rub with fingertips until the mixture resembles coarse sand with pea-sized butter pieces remaining. Scatter across the top of the batter before baking in place of the plain sugar sprinkle. The streusel bakes into a crumbly, buttery, cinnamon-scented crust that adds textural contrast to every slice and makes the banana bread look like something from a bakery display case rather than a home kitchen.
- Gluten-Free Banana Bread: Replace the all-purpose flour with a good quality gluten-free baking flour blend that contains xanthan gum — a 1:1 replacement works for this recipe without any additional adjustments. Add 1 extra tablespoon of Greek yogurt to compensate for the slightly drier texture that most gluten-free flour blends produce compared to wheat flour. Increase the bake time by 5–8 minutes since gluten-free batters take slightly longer to set at the centre. The finished loaf is slightly denser than the wheat version but with the same moist, banana-forward character and none of the gummy, heavy texture that poorly made gluten-free banana breads often produce.
Seasonal Relevance
A banana bread recipe is genuinely year-round — bananas are one of the few fruits available at consistent quality and price in every season without any meaningful variation. The occasion and the additions that work best alongside it shift with the calendar, though. From October through February, banana bread is at its most comforting and its most appropriate as a warming baked good — the brown butter version, the chocolate chip build, and the walnut loaf all suit cold weather baking in character and in the pleasure they provide on a cold morning. Winter is when banana bread feels most like what it is — a slow, warm, fragrant bake that makes a kitchen feel genuinely welcoming. From May through September, banana bread muffins in the morning and slices alongside iced coffee in the afternoon are the natural formats — lighter, more portable, and less oven-intensive than a full winter bake. Spring and early summer, March through May, is when the streusel version and the cream cheese swirl look most appealing — the more elaborate presentation suits the season’s instinct toward fresh, celebratory baking after the plain comfort food of winter. In all seasons, the rule is the same — riper bananas, more flavour, better bread.
Conclusion
A great banana bread recipe is one of the most useful things a home baker can have — it turns overripe bananas into something genuinely outstanding, requires under 15 minutes of active work, and produces a loaf that improves with time and stores beautifully for days. Get the bananas properly ripe, fold rather than mix, add the Greek yogurt, sprinkle the sugar on top, and cool completely before slicing — those five things done correctly produce a banana bread that earns genuine compliments rather than polite ones. Make the classic version first and understand the batter feel and the baking cues. Then move through the variations — the brown butter build, the cream cheese swirl, the chocolate chip standard — and find the banana bread recipe that becomes your automatic answer to a bunch of overripe bananas. Once you have it, the bananas on the counter stop being a problem and start being the reason to bake.
FAQs
Q: Why is my banana bread gummy or wet in the middle? A gummy or wet centre in banana bread is caused by one of three things — insufficient bake time, opening the oven too early which caused the centre to sink before it set, or bananas that were so wet they added more moisture than the recipe’s structure could handle. Always check doneness with a toothpick at the 55-minute mark and bake in 5-minute increments beyond that if the toothpick comes out wet. If the top is browning faster than the centre is cooking, tent with foil and continue baking — the foil protects the crust while the interior finishes. Very overripe, almost liquid bananas occasionally need 1–2 tablespoons less than their measured volume to keep the moisture balance in the correct range.
Q: Can I use frozen bananas in a banana bread recipe? Yes — and frozen bananas are often even better than fresh overripe ones for banana bread. Freezing and thawing banana breaks down the cell structure and releases more natural sugars and moisture than an equivalent fresh banana, producing a more intensely flavoured, sweeter mash. Thaw frozen bananas completely at room temperature or in the refrigerator overnight — they will be very soft and release a significant amount of liquid when thawed. Pour this liquid into the mash rather than discarding it — it contains banana-flavoured sweetness that improves the loaf. Measure the mash after thawing to ensure you have the correct quantity since frozen bananas can vary in size.
Q: How do I know when banana bread is fully baked? Three indicators together — not just one — confirm a properly baked banana bread. A toothpick or thin skewer inserted into the thickest part of the loaf comes out with a few moist crumbs but no wet batter. The top is deeply golden-brown and the sides have pulled away slightly from the edges of the pan. The internal temperature reads 200–205°F on an instant-read thermometer inserted into the centre. The toothpick test is the most commonly used but least reliable of the three alone — colour and temperature together with the crumb test produce the most consistent result across different ovens, different pan materials, and different moisture levels in the batter.