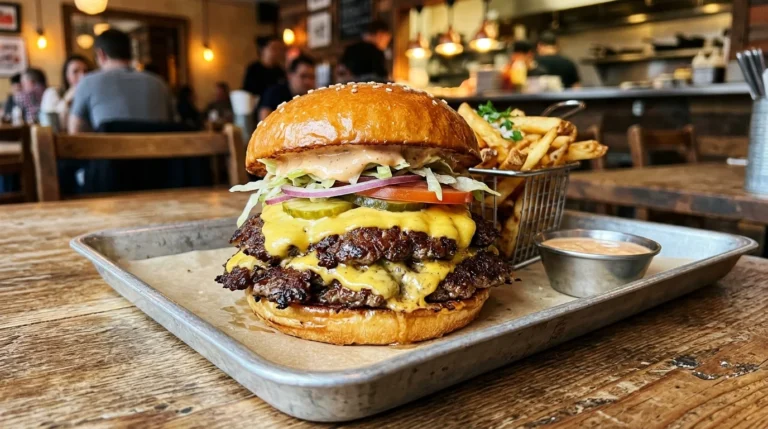
Smash Burger Tacos Crispy, Juicy & Ready in 20 Minutes
Smash burger tacos are what happens when two of the most beloved street foods collide in the best possible way. Take the technique that makes a smash burger extraordinary — thin beef pressed hard onto a screaming hot surface until the edges go lacey and the crust turns deeply golden and build it directly into a flour tortilla instead of a bun.
The result is a taco that has no business being this good for how fast it comes together. Crispy caramelised beef, melted cheese, cool shredded lettuce, pickles, and a tangy burger sauce, all folded into a warm tortilla with a built-in crunch from the seared underside. Whether you’re making these on a Tuesday night or setting up a taco station for the weekend, smash burger tacos deliver something genuinely new every single time. No complicated steps — just pure smash burger taco satisfaction, done in 20 minutes flat.
Ingredients
For the Smash Burger Taco Patties (makes 8 tacos):
- 500g (1.1 lb) 80/20 ground beef [fat ratio is non-negotiable — leaner beef won’t deliver the crust]
- 1 tsp fine salt
- 1 tsp black pepper, freshly ground
- 1 tsp garlic powder
- ½ tsp onion powder
- ½ tsp smoked paprika
- 1 tbsp neutral oil [vegetable or canola — high smoke point required]
For the Smash Burger Sauce:
- ½ cup mayonnaise
- 2 tbsp ketchup
- 1 tbsp yellow mustard
- 1 tbsp sweet pickle relish [or finely minced dill pickles]
- 1 tsp white wine vinegar
- ½ tsp garlic powder
- ½ tsp smoked paprika
- Pinch of sugar
- Salt and black pepper, to taste
For the Build:
- 8 small flour tortillas [6-inch size — corn tortillas can be used but flour works better here]
- 8 slices American cheese [or pepper jack — American melts fastest and most evenly]
- 1 cup shredded iceberg lettuce
- 1 medium white onion, very finely diced [raw, for topping]
- 8–12 dill pickle slices
- 2 tbsp unsalted butter [for finishing the tortillas]
Optional Toppings:
- Sliced jalapeños (optional)
- Hot sauce, for serving (optional)
- Fresh diced tomato (optional)
- Sesame seeds, for garnish (optional)
- Extra mustard or ketchup, for serving (optional)
Step-by-Step Instructions
Step 1: Gather and Prep Your Ingredients
Before the pan goes on, get everything ready and within arm’s reach. Divide the ground beef into 8 equal portions — roughly 60–65g each — and roll each one loosely into a ball without compressing or overworking the meat. Overworking develops the protein structure in a way that fights the smash and makes the crust form unevenly. Season each ball lightly on the outside with salt, pepper, garlic powder, onion powder, and smoked paprika. Finely dice the onion, shred the lettuce, lay the cheese slices out in a line, and have your tortillas stacked nearby. Smash burger tacos cook fast — 90 seconds per side — which means there is zero time to prep mid-cook once the first ball hits the pan.
Pro Tip: Refrigerate the seasoned beef balls for 15 minutes before cooking. Cold beef holds its shape better when pressed flat and produces a thinner, more even patty across the tortilla surface. Warm beef spreads inconsistently and can tear when you apply pressure with the spatula.
Step 2: Make the Smash Burger Sauce
In a small bowl, combine the mayonnaise, ketchup, yellow mustard, sweet pickle relish, white wine vinegar, garlic powder, and smoked paprika. Stir until completely smooth and uniform. Taste it — the sauce should be tangy, slightly sweet, smoky, and rich. Adjust with a pinch of sugar if the vinegar is too sharp, or add a little extra mustard if you want more bite. Cover and refrigerate until needed. This sauce keeps in a sealed jar for up to 5 days and genuinely improves after the first 24 hours as the flavours settle together into something more rounded and cohesive than when freshly mixed.
Pro Tip: Make the sauce at least 30 minutes before you plan to serve. The garlic powder and smoked paprika need time to bloom fully into the mayo base — a sauce used immediately after mixing tastes raw and slightly dusty at the edges. Even a short rest in the refrigerator makes a measurable difference to the finished flavour.
Step 3: Heat the Pan and Prepare the Tortillas
Heat a large cast iron skillet or heavy flat-bottomed pan over high heat for 3–4 minutes until it is genuinely, properly hot. This is not a step to rush — an insufficiently hot pan produces a steamed patty rather than a seared one, and the entire point of a smash burger taco is the crust that only develops through extreme direct heat. While the pan heats, lay the flour tortillas flat on the counter and have them ready to go. You’ll place a beef ball directly onto the tortilla and press both into the pan together — the tortilla becomes the base the beef smashes into, which means the underside of the tortilla develops its own golden, slightly crispy sear that adds texture and structural integrity to the finished taco.
Pro Tip: Run a very thin film of neutral oil across the surface of the pan before the first batch, then skip the oil for subsequent batches — the rendered beef fat provides more than enough lubrication after the first round and helps build a seasoned surface that releases each taco cleanly.
📖 Read More: smash burger
Step 4: Smash and Sear the Beef Directly on the Tortilla
Place a flour tortilla flat in the hot pan. Immediately place a beef ball in the centre of the tortilla and press it down hard and flat using a heavy spatula, a small cast iron, or a dedicated burger press — hold the pressure for a full 8–10 seconds. The beef should spread to roughly ¼ inch thickness across the centre of the tortilla, and the edges should look jagged and lacey where the fat has made contact with the hot surface. Scatter a pinch of the finely diced raw onion directly onto the raw face of the beef while it cooks — just like a traditional smash burger preparation. Cook undisturbed for 90 seconds to 2 minutes until the edges of the beef are visibly browned, crispy, and pulling slightly away from the tortilla surface.
Pro Tip: Press the beef ball off-centre slightly toward the middle of the tortilla rather than dead-centre — this accounts for the natural spreading that happens during the smash and keeps the beef from pushing out over the tortilla edge. A patty that stays within the tortilla boundary holds together cleanly when folded and eaten.
Step 5: Flip, Cheese, and Finish
Using a thin, wide metal spatula, flip the entire taco — tortilla and beef together — in one confident motion. The beef side should now face up, deeply golden and crusted at the edges, with the seared tortilla face visible beneath. Immediately place a slice of American cheese across the beef and press it gently so it makes full contact with the hot surface. Let the cheese melt for 30–40 seconds — American cheese melts completely at this temperature in under a minute and produces that glossy, fully molten layer that defines the dish. Add a small scrape of butter around the edge of the tortilla while the cheese melts to give the outer tortilla surface a final round of colour and flavour. Remove from the pan and repeat with the remaining beef balls and tortillas, cooking two at a time if your pan is wide enough.
Pro Tip: Never crowd the pan. Two smash burger tacos maximum per cook — adding more drops the pan temperature significantly and you lose the sear entirely. The pan needs 60–90 seconds to recover its full heat between batches. Patience between rounds is what keeps every taco in the batch as good as the first one.
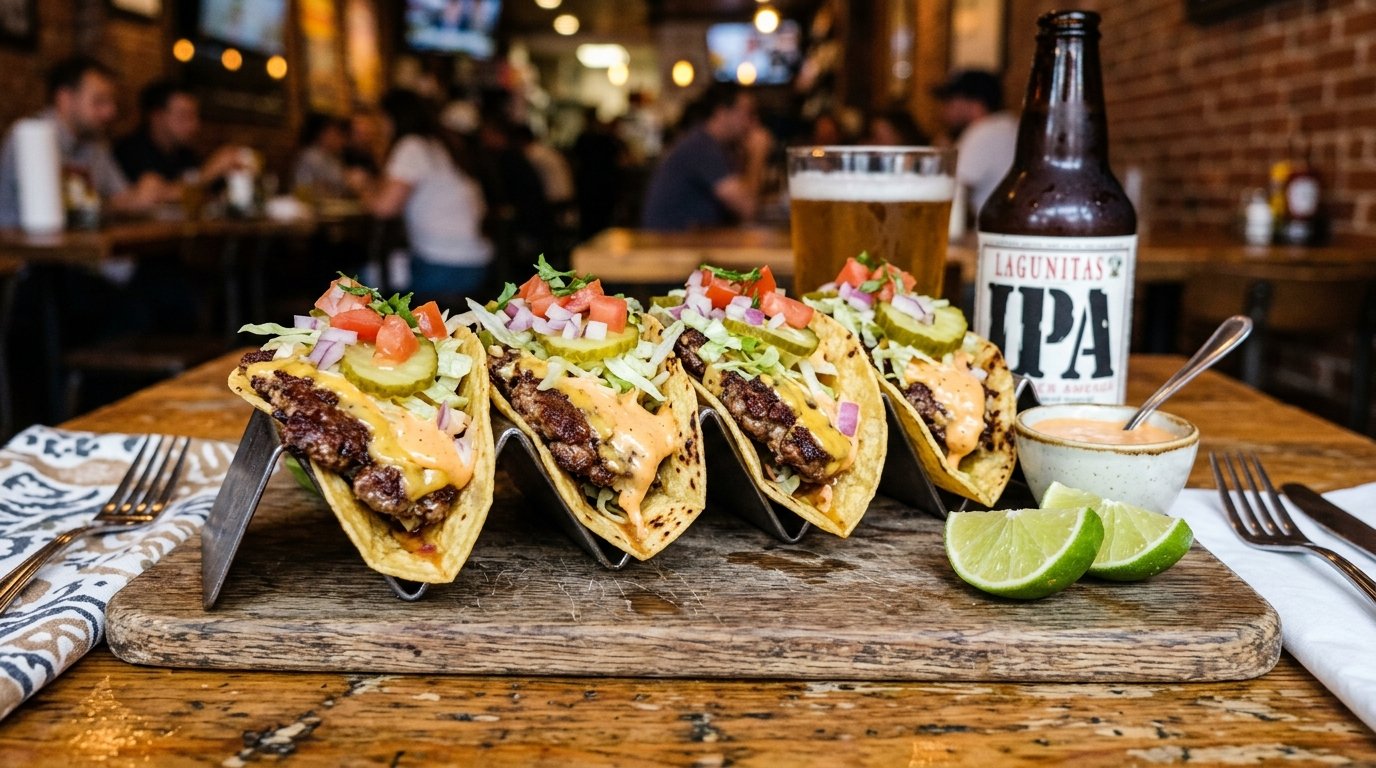
Step 6: Sauce, Fold, Garnish, and Serve
Work quickly once the cheese is melted and the taco is off the heat. Spread a generous spoonful of smash burger sauce directly across the melted cheese — spreading it onto the cheese rather than the tortilla keeps the tortilla crispy longer. Add 3–4 pickle slices, a small handful of shredded iceberg lettuce, and a pinch of extra diced onion on one half of the taco. Fold the taco in half like a classic taco rather than rolling it — the seared tortilla is pliable enough to fold cleanly without cracking. Serve immediately, seam-side down on the plate, with extra sauce and hot sauce on the side. Smash burger tacos are at their absolute peak the moment they’re assembled — the crust is still crispy, the cheese is still molten, and the lettuce is still cold against the hot beef.
Pro Tip: Fold the taco toward the side that has the toppings rather than away from it — this keeps the filling compacted inside rather than spilling out the open edge as you eat. Pressing the fold lightly for 5 seconds before releasing helps the taco hold its shape on the plate.
Cook Time
Total Time: 20 minutes | Prep: 8 minutes | Sauce: 3 minutes | Cook: 10 minutes One cast iron pan — eight tacos on the table in 20 minutes.
Servings
Makes 8 smash burger tacos — serves 3 to 4.
Nutritional Information (approx. per serving — 2 tacos with sauce and toppings)
| Nutrient | Amount |
|---|---|
| Calories | 580 kcal |
| Fat | 36g |
| Saturated Fat | 14g |
| Carbohydrates | 34g |
| Protein | 30g |
| Sugar | 6g |
| Fiber | 1g |
| Sodium | 880mg |
| Vitamin C | 3mg |
| Potassium | 400mg |
| Calcium | 240mg |
Values are approximate and will vary based on ingredients used.
Storage Instructions
Smash burger tacos are a cook-and-eat dish at their core — the crispy seared tortilla and lacey beef crust lose their defining texture within minutes of sitting, and there is no reheating method that fully brings them back. That said, the components store and reheat far better than the assembled taco does. Store cooked beef patties separately from the tortillas in an airtight container in the refrigerator for up to 2 days. Reheat the beef patties in a dry cast iron over medium-high heat for 60–90 seconds per side — this revives some of the surface texture and heats the beef through without drying it out the way a microwave inevitably does. Cook fresh tortillas to order when reheating — a flour tortilla takes 60 seconds per side in a dry pan and is always better fresh than stored. The smash burger sauce keeps in a sealed jar in the refrigerator for up to 5 days and needs no reheating — it goes straight from the jar to the taco. For meal prep, the most practical approach is to portion the raw seasoned beef balls into a container and refrigerate them for up to 24 hours before cooking. From there, the smash burger tacos go from cold beef to plated in under 12 minutes. Freezing raw beef balls is also an excellent option — place them on a lined baking sheet, freeze until solid, transfer to a freezer bag with parchment between each one, and freeze for up to 3 months. Cook directly from frozen, adding an extra 60–90 seconds on the first side to account for the lower starting temperature.
Suggestions
- Bacon Smash Burger Tacos: Fry thin-cut bacon in the cast iron before cooking the beef — the rendered fat left in the pan adds an additional flavour layer to every subsequent smash. Crumble one strip of crispy bacon directly onto the melted cheese layer before folding. The combination of beef crust, melted American cheese, bacon, pickle, and smash burger sauce in a seared tortilla is the version of this dish that gets requested by name at every future gathering.
- Spicy Jalapeño Build: Add ½ teaspoon of cayenne to the beef seasoning blend and stir 1 tablespoon of hot sauce directly into the smash burger sauce before spreading. Layer 3–4 slices of pickled jalapeño alongside the standard pickle slices inside the taco. Finish with a drizzle of hot honey across the melted cheese just before folding — the sweet heat against the salty, crispy beef is one of the most addictive flavour combinations this format can carry.
- Double Smash Burger Taco: Cook two thin beef balls sequentially on the same tortilla — smash the first, cook, flip, add cheese, then immediately place a second ball on top of the cheese and smash again before the first round of cheese has fully set. The result is a double-patty smash burger taco with two distinct crust layers and a molten cheese centre between them. It’s indulgent, messy, and completely worth it.
- Pepper Jack and Chipotle Version: Replace the American cheese with pepper jack, which takes an extra 30 seconds to melt fully but brings a slow, creamy heat that American cheese can’t replicate. Replace half the mayonnaise in the smash burger sauce with chipotle mayo — or stir 1 teaspoon of finely minced chipotle in adobo directly into the standard sauce. The smoky chipotle depth against the crispy beef and melting pepper jack produces a smash burger taco that tastes noticeably more complex than the classic build.
- Smash Burger Taco Bar: Cook all eight tacos through the cheese-melt stage and hold them in a low oven — 200°F — loosely covered with foil for up to 15 minutes while guests arrive. Set out the sauce, lettuce, pickles, onion, jalapeños, and any optional toppings in individual small bowls. Let everyone build their own fold at the table — the interactive element works well for gatherings, and it removes the pressure of timing every taco to order while still serving them warm and fresh.
- Dairy-Free Build: Skip the American cheese entirely and instead spread a layer of mashed avocado or a dairy-free chipotle aioli directly onto the hot beef immediately after flipping — the heat of the beef softens the avocado into a creamy layer that plays the same richness role as melted cheese. Use a vegan mayo base for the smash burger sauce. The tortilla sear and beef crust carry the taco completely without any dairy involvement.
- Ground Turkey Version: Swap the 80/20 ground beef for 85/15 ground turkey — leaner than the beef recommendation but rich enough in fat to still smash and sear with some crust development. Add an extra ¼ teaspoon of smoked paprika and a teaspoon of Worcestershire sauce to the turkey seasoning to compensate for the milder base flavour. The technique is identical and the result is a lighter smash burger taco that still delivers the key textural experience the dish is built around.
- Weight-Loss Friendly Option: Use 90/10 lean ground beef and accept a slightly less lacey crust in exchange for the lower fat content — the smash and sear still work, just with less dramatic edge texture. Use one tortilla per taco instead of a thick fold, reduce the cheese to a half-slice per taco, and thin the smash burger sauce with an extra teaspoon of vinegar and a tablespoon of low-fat Greek yogurt to reduce the calorie density without losing the flavour profile. Each taco comes in under 200 calories, making four tacos a satisfying and genuinely balanced meal.
Seasonal Relevance
Smash burger tacos work in every season but earn their biggest audience in two distinct windows. From May through September, they’re the ultimate outdoor cooking dish — a cast iron placed over a gas grill on high heat replicates the stovetop sear almost perfectly, and cooking outside during summer keeps the kitchen from heating up during the warmest months. Summer also brings the freshest toppings to the table — peak-season tomatoes in July and August, crisp iceberg from local farms, and fresh jalapeños that have a cleaner, brighter heat than pickled alternatives. From October through March, smash burger tacos shift firmly into the indoor cast iron category — a fast, high-impact weeknight dinner that delivers serious flavour in the time it takes to heat the pan and portion the beef. In winter, lean into the bacon version and the double-patty build for something richer and more warming. In spring, April through May, the lighter variations — ground turkey, avocado topping, fresh tomato — start feeling more appropriate as the weather shifts and lighter food becomes more appealing again. The technique itself never changes with the season — only the toppings and the cooking environment need to adapt.
Conclusion
Smash burger tacos prove that the best food ideas are the ones that seem obvious the moment you try them and impossible to un-know after. The technique is borrowed directly from classic smash burger preparation — hot surface, cold beef, hard press, no movement — but the tortilla base changes everything about the eating experience. You get the crust, the cheese pull, the sauce, and the crunch of the pickles and lettuce, but in a format that’s faster to make, easier to serve, and more versatile than a traditional burger build. Make the classic version first and understand the smash, the timing, and the fold. Then work through the variations — the bacon build, the double patty, the chipotle pepper jack version. Once smash burger tacos are in your regular rotation, the only question is why it took this long to put them there.
FAQs
Q: Why do smash burger tacos use flour tortillas instead of corn? Flour tortillas have more flexibility and tensile strength than corn tortillas, which means they hold up under the pressure of the smash without tearing and fold cleanly without cracking once the taco is assembled. They also develop a better sear on the underside when pressed against a hot cast iron — a golden, slightly crispy bottom that adds genuine texture to the finished taco. Corn tortillas can be used, but they’re more likely to crack during the smash and fold, and their sturdier texture doesn’t pick up the sear the same way. Flour is the right call for this specific technique.
Q: Do I need a special burger press to make smash burger tacos? No — a dedicated burger press helps but is not necessary. A heavy spatula with a flat, wide blade works well. A small cast iron skillet pressed down over a piece of parchment paper is another excellent option. A small heavy pot with a flat base also works. The key is applying sustained, even pressure for a full 8–10 seconds immediately after the beef ball makes contact with the pan — whatever tool delivers that pressure flatly and firmly will produce the right result.
Q: Why is 80/20 ground beef required for the best smash burger tacos? The 20% fat content in 80/20 beef is what creates the lacey, crispy crust when pressed against a hot surface. The fat renders immediately into the contact zone and fries the exterior while the interior stays juicy. Leaner beef — 90/10 or above — doesn’t have sufficient fat to generate the same reaction. The crust comes out paler, the texture is drier, and the edges don’t develop the distinctive jagged, caramelised appearance that defines a properly executed smash. 80/20 is not a suggestion — it’s a technical requirement for the technique to work correctly.
Q: Can I cook smash burger tacos on a regular non-stick pan? Non-stick pans are not suitable for this technique. They cannot safely handle the high heat required — most non-stick coatings begin to degrade above 450°F and should not be used at the temperatures a smash burger taco demands. They also don’t retain heat as effectively as cast iron, which means the surface temperature drops the moment the cold beef makes contact and you lose the sear you’re after. A cast iron skillet is the correct tool. A heavy stainless steel pan is the next best alternative.
Q: My beef keeps spreading off the edge of the tortilla when I smash — how do I fix it? Place the beef ball slightly toward the centre of the tortilla rather than dead-centre, accounting for the spread that happens during the smash. Aim for a position that leaves about an inch of clear tortilla around the circumference before you press — the beef will cover most of that during the smash and land approximately within the tortilla boundary. Also make sure your tortillas are 6-inch diameter rather than larger — a bigger tortilla encourages a wider smash that more easily goes edge to edge.
Q: Can I use pre-made burger patties instead of fresh beef balls? Pre-made patties don’t smash effectively — the beef has already been compressed and formed, which means it resists the pressure and doesn’t spread into the lacey, thin format that gives smash burger tacos their character. The crust forms inconsistently and the edges remain thick rather than thin and crispy. Fresh, loosely rolled beef balls are the only starting point that produces the correct result. Fortunately, portioning and rolling takes under 3 minutes and requires nothing beyond a kitchen scale and your hands.
Q: What’s the best way to serve smash burger tacos for a crowd without losing quality? Cook all the tacos through the cheese-melt step and hold them in a single layer on a wire rack set over a baking sheet in a 200°F oven, uncovered, for up to 15 minutes. The low oven heat keeps them warm without steaming the tortilla or softening the crust significantly. Set out all the cold toppings separately and let guests build their own fold at the table — the taco stays crisp in the oven and the cold toppings go on fresh per person. This approach allows you to cook all eight tacos in three to four batches before guests even sit down, removing all timing pressure from the serving process.