White Chicken Chili Creamy, Hearty & Ready in 45 Minutes
White chicken chili is the bowl of food that earns a permanent spot in the winter rotation the first time you make it. It’s everything a classic beef chili delivers — deep flavour, satisfying weight, the kind of warmth that settles in and stays — but built on a white bean and chicken base with green chiles and a creamy broth that makes it simultaneously lighter and more interesting than the red version.
It comes together in one pot in under 45 minutes, holds beautifully for days in the refrigerator, and tastes better the second day than the first as the flavours develop overnight. Whether you’re feeding a weeknight family dinner, meal prepping for the week, or bringing something to a gathering that fills everyone up and gets asked about every time, white chicken chili delivers without fail. No complicated steps — just pure white chicken chili comfort, ready in one pot in 45 minutes.

Ingredients
For the White Chicken Chili:
- 700g (1.5 lb) boneless, skinless chicken breast [or thighs — thighs stay juicier]
- 2 cans (400g each) white beans [cannellini or Great Northern — drained and rinsed]
- 1 can (120g / 4 oz) diced green chiles [mild or hot — your preference]
- 1 medium yellow onion, finely diced
- 4 cloves garlic, minced
- 1 medium jalapeño, finely diced [optional — adds heat]
- 1 tbsp olive oil
- 4 cups (950ml) low-sodium chicken broth
- 1 cup frozen corn kernels [or fresh — thawed]
- 1 tsp ground cumin
- 1 tsp dried oregano
- ½ tsp smoked paprika
- ½ tsp garlic powder
- ½ tsp onion powder
- ¼ tsp cayenne pepper [adjust to heat preference]
- Salt and black pepper, to taste
For the Creamy Finish:
- 4 oz (115g) cream cheese, softened and cubed
- ½ cup sour cream [or plain Greek yogurt]
- Juice of 1 lime
For Serving:
- Shredded sharp cheddar or Monterey Jack cheese
- Sour cream, for dolloping
- Fresh cilantro, roughly chopped
- Sliced jalapeño, for heat
- Diced avocado or guacamole
- Crushed tortilla chips, for crunch
- Lime wedges
Step-by-Step Instructions
Step 1: Gather and Prep Your Ingredients
Before the pot goes on, get every component prepped and ready. Dice the onion, mince the garlic, dice the jalapeño if using, drain and rinse the beans, and open the green chiles. Cut the cream cheese into small cubes and leave it at room temperature — cold cream cheese added to hot liquid clumps and takes significantly longer to melt smoothly into the broth than softened cream cheese that has come to room temperature. The white chicken chili comes together quickly once the aromatics are sautéed, so having everything prepped before the olive oil goes into the pot keeps the cook moving efficiently without any stops.
Pro Tip: If using chicken breast, consider using chicken thighs instead for a juicier, more forgiving result. Chicken thighs have higher fat content that protects against drying out during the simmering stage, and they shred into more tender, flavourful pieces than breast. If you prefer breast, cut it into even, uniform pieces before adding to the pot — uniform size ensures even cooking and prevents some pieces from being overcooked while others are still underdone.
Step 2: Sauté the Aromatics
Heat the olive oil in a large Dutch oven or heavy-bottomed pot over medium-high heat until shimmering. Add the diced onion and cook for 4–5 minutes, stirring occasionally, until softened and just beginning to turn golden at the edges. Add the minced garlic, diced jalapeño, ground cumin, dried oregano, smoked paprika, garlic powder, onion powder, and cayenne directly to the onion and stir continuously for 60–90 seconds until the spices are fragrant and coating the onion evenly. Cooking the spices with the aromatics rather than adding them to the liquid later blooms the volatile oils in the spices — the flavour that goes into the chili base is significantly deeper and more rounded than spices added cold to a liquid.
Pro Tip: The 60–90 seconds of spice blooming is the step most people rush and the one that produces the most noticeable flavour difference in the finished bowl. Keep the heat at medium-high, stir continuously so nothing burns, and pull the pot to the next step the moment the spices smell fragrant and toasted rather than raw and dusty. Burned spices are bitter and unrecoverable — fragrant and toasted is the target, nothing beyond.
Step 3: Add the Chicken and Broth
Add the whole chicken pieces — do not cut them up yet — directly into the pot with the sautéed aromatics. Pour in the chicken broth and stir to combine, scraping any spice bits from the bottom of the pot. Add the diced green chiles and bring the whole pot to a gentle boil over medium-high heat. Once boiling, reduce the heat to medium-low, cover partially with a lid, and simmer for 20–25 minutes until the chicken is completely cooked through and tender enough to shred easily when pressed with a fork. The white chicken chili broth should taste bold and well-seasoned at this stage — taste it and adjust salt, pepper, and spices before the beans and cream cheese go in, as those components will dilute the seasoning slightly.
Pro Tip: Resist the urge to cut the chicken before simmering it whole. Whole pieces of chicken simmered in broth stay significantly juicier than pre-cut pieces — the surface area exposed to the hot liquid is smaller, which means less moisture is driven out during cooking. Shredding the chicken after it’s cooked through produces a texture that is far superior to diced chicken in any chili application — it pulls into irregular, broth-soaked strands that hold the sauce in every piece.
📖 Read More: Chicken Breast Recipes
Step 4: Shred the Chicken and Add the Beans
Remove the cooked chicken pieces from the pot using tongs and transfer to a cutting board. Using two forks — or your hands with heat-safe gloves — shred the chicken into bite-sized irregular pieces while the broth continues to simmer gently. Return the shredded chicken to the pot immediately. Add the drained white beans and the frozen corn directly to the pot and stir to combine. Increase the heat to medium and cook for 5 minutes to warm the beans and corn through and allow them to begin absorbing the seasoned broth. Mash approximately ¼ cup of the beans against the side of the pot with the back of a spoon before stirring them in — this releases the starch inside the beans and naturally thickens the broth without adding any flour or cornstarch.
Pro Tip: The mashed bean technique is the single most effective thickening method for white chicken chili and the one that produces the most natural-tasting body in the finished bowl. Commercial thickeners like cornstarch add a slightly gluey, artificial mouthfeel that the mashed bean method never produces. Mash against the side of the pot rather than removing beans to a separate bowl — you want the starch to release directly into the simmering broth where it disperses immediately.
Step 5: Add the Cream Cheese and Finish
Reduce the heat to medium-low. Add the softened, cubed cream cheese to the simmering pot and stir continuously for 2–3 minutes until every cube has melted completely into the broth and the liquid has turned creamy, opaque, and slightly thickened throughout. Add the sour cream and lime juice and stir to combine — do not let the pot boil after the sour cream goes in, as high heat can cause sour cream to curdle and break the creamy consistency. Taste the finished white chicken chili one final time and adjust salt, pepper, lime juice, and cayenne as needed. The chili should be creamy, savoury, and mildly spiced with a bright citrus note from the lime cutting through the richness of the cream cheese base.
Pro Tip: If the chili looks too thin after the cream cheese is fully melted, the mashed bean technique in the previous step needs adjusting for next time — or mash an additional ¼ cup of beans now and stir through for another 2 minutes. If it’s thicker than you’d like, add a small splash of chicken broth and stir until the consistency loosens to where you want it. Adjust thickness before adding the sour cream — it’s easier to correct before the final dairy component goes in.
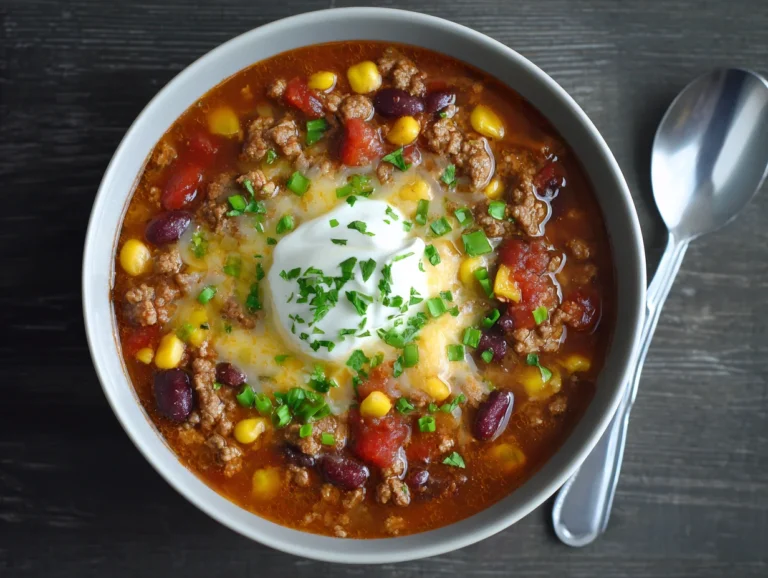
Step 6: Ladle, Garnish, and Serve
Ladle the finished white chicken chili into warm bowls immediately — the cream cheese base thickens as it cools and the chili is at its best the moment it comes off the heat. Top each bowl generously with shredded sharp cheddar or Monterey Jack, a dollop of sour cream, a scattering of fresh cilantro, sliced jalapeño, and diced avocado. Add a handful of crushed tortilla chips across the top for crunch — they absorb the creamy broth as you eat and add a savoury, salty element that contrasts beautifully against the mild creaminess of the white chicken chili base. Serve with lime wedges on the side for an extra squeeze at the table.
Pro Tip: Warm the serving bowls before ladling by filling them with hot water for 60 seconds, then emptying and drying quickly. White chicken chili has a cream cheese base that thickens noticeably as it cools — a warm bowl extends the time the chili stays at the right consistency and temperature from the first spoonful to the last. Cold bowls accelerate the thickening significantly and the chili starts to feel stodgy before it’s half finished.
Cook Time
Total Time: 45 minutes | Prep: 10 minutes | Sauté: 6 minutes | Simmer: 25 minutes | Finish: 5 minutes One pot — white chicken chili on the table in 45 minutes.
Servings
Serves 6 generous bowls — approximately 400–450ml per serving.
Nutritional Information (approx. per serving — with cream cheese and sour cream, no toppings)
| Nutrient | Amount |
|---|---|
| Calories | 420 kcal |
| Fat | 16g |
| Saturated Fat | 7g |
| Carbohydrates | 32g |
| Protein | 38g |
| Sugar | 4g |
| Fiber | 8g |
| Sodium | 620mg |
| Vitamin C | 14mg |
| Potassium | 780mg |
| Calcium | 140mg |
Values are approximate and will vary based on ingredients used.
Storage Instructions
White chicken chili is one of the best make-ahead and leftover meals available — the flavour improves significantly overnight as the chicken absorbs the spiced broth and the cream cheese base becomes more integrated and cohesive. Allow the chili to cool completely at room temperature — no more than 30 minutes — before transferring to an airtight container and refrigerating for up to 4 days. The chili will thicken considerably as it chills due to the cream cheese and bean starch — this is expected and easily resolved. When reheating, add a small splash of chicken broth — 2–3 tablespoons per serving — before warming in a saucepan over medium-low heat, stirring continuously until the broth is incorporated and the chili returns to its original creamy consistency. Avoid boiling during reheating — high heat after the cream cheese has already been incorporated can cause it to break and leave greasy pools on the surface rather than the smooth, creamy broth of the original. Microwave reheating works for individual portions — heat in 60-second intervals with a splash of broth, stirring between each. For freezing, white chicken chili freezes very well for up to 3 months despite the dairy components — cream cheese and sour cream can separate slightly on thawing but a vigorous stir over gentle heat brings the emulsion back together. Freeze in individual portion containers for the most practical make-ahead use. Thaw overnight in the refrigerator and reheat gently as described above. Add a fresh squeeze of lime and a fresh cilantro scatter after reheating to revive the brightness that fades during freezing.
📖 Read More: Chicken Thigh Recipes
Suggestions
- Slow Cooker White Chicken Chili: Combine all ingredients except the cream cheese, sour cream, and lime juice in the slow cooker. Cook on low for 6–8 hours or high for 3–4 hours. Remove and shred the chicken, return it to the pot, then stir in the softened cream cheese, sour cream, and lime juice in the final 20 minutes with the lid off on the high setting. The slow cooker version develops even deeper flavour than the stovetop method and requires almost zero active attention — the most practical version for busy weekdays.
- Rotisserie Chicken White Chili: Skip the chicken simmering stage entirely — shred 3 cups of rotisserie chicken and add it directly with the beans and corn after the aromatics and broth have been combined and simmered for 5 minutes. The rotisserie chicken reduces total cook time to under 25 minutes and adds a slightly smoky, roasted flavour note to the chili from the pre-seasoned skin. This is the fastest version of white chicken chili in the list and the right choice for any weeknight where 45 minutes feels like too long.
- Spicy White Chicken Chili: Double the cayenne to ½ teaspoon, add 1 tablespoon of hot sauce directly to the broth, and use hot diced green chiles rather than mild. Add 1 teaspoon of chipotle powder alongside the standard spice blend for a smoky heat layer that builds slowly rather than hitting immediately. Finish each bowl with sliced fresh jalapeño and an extra drizzle of hot sauce. This version is bold enough to serve at any gathering where the preference for spicy food is clear.
- Dairy-Free White Chicken Chili: Replace the cream cheese with ¾ cup of raw cashew cream — blend ½ cup of soaked cashews with ¼ cup of water until completely smooth. Replace the sour cream with plain coconut yogurt. Both substitutions produce a creamy, rich broth without any dairy and without the separation risk that some dairy alternatives carry at high heat. The finished chili tastes slightly different from the original — nuttier and lighter — but is fully satisfying on its own terms and works well for any lactose-free or dairy-free requirement at the table.
- White Chicken Chili With Salsa Verde: Add ½ cup of jarred or homemade salsa verde — tomatillo salsa — to the pot along with the green chiles. The salsa verde adds a tangy, tomatillo acidity that brightens the white chicken chili base and adds a layer of complexity that green chiles alone don’t produce. Use a mild salsa verde for a subtle effect or a hot one if more heat is wanted. This variation is the one most likely to get someone asking what’s in the chili — it’s distinctive without being exotic.
- White Chicken Chili Topped With Cornbread: Make a simple cornbread — 1 cup cornmeal, 1 cup flour, 1 tbsp sugar, 1 tsp baking powder, 1 egg, 1 cup milk, ¼ cup oil — and bake in a cast iron skillet at 400°F for 20 minutes. Serve warm wedges of cornbread alongside each bowl of white chicken chili for a complete, substantial meal that requires nothing else on the table. The slightly sweet, crumbly cornbread against the savoury, creamy chili is one of the most classic American comfort food pairings available.
- High-Protein White Chicken Chili: Increase the chicken to 900g, use three cans of white beans instead of two, and add ½ cup of plain Greek yogurt in addition to the sour cream at the finish stage. Skip the cream cheese and replace it with 2 tablespoons of blended cottage cheese for a lighter, higher-protein alternative that still adds creaminess to the broth. Each serving delivers over 48g of protein — one of the highest-protein bowl meals available in a single-pot format at this cooking time.
- Weight-Loss Friendly White Chicken Chili: Replace the cream cheese with ¼ cup of blended low-fat cottage cheese whisked into ¼ cup of warm broth until smooth before adding to the pot. Replace the sour cream with low-fat Greek yogurt. Use chicken breast rather than thighs and reduce the oil to 1 teaspoon. The flavour profile stays intact — the green chiles, white beans, and spice blend carry the character of the dish — while the calorie count drops to under 320 per generous bowl without any meaningful sacrifice in satisfaction or creaminess.
📖 Read More: Buffalo Chicken Dip
Seasonal Relevance
White chicken chili is a cool-weather dish at its core — it’s built to be eaten from October through March when a pot simmering on the stove for 45 minutes warms the kitchen and the bowl warms everything that follows. October and November are the peak months for this recipe — the transition from lighter autumn food to the heavier, more warming comfort food of winter happens at this point in the year and white chicken chili sits perfectly at that intersection. It’s hearty enough to feel substantial on a cold evening but lighter than a red beef chili, which makes it the right bridge between seasons. December through February is when the slow cooker version earns the most use — a batch started in the morning is ready by dinner without any active cooking time during the coldest months of the year. The chili also appears reliably at Super Bowl gatherings in February and at any winter potluck where crowd-feeding is the priority. Spring, March through April, is the tail end of white chicken chili season — the last few cold days before the weather shifts genuinely call for one more bowl before the move to lighter spring cooking begins. Summer is the wrong season for this recipe — the cream cheese base and the heavy bean and chicken combination simply don’t match the weather, and even the most devoted white chicken chili fans tend to wait for the first cool autumn day to start the pot again.
Conclusion
White chicken chili earns its place in the permanent cold-weather rotation because it delivers everything a comfort food dinner should — deep, developed flavour, satisfying heartiness, creamy richness, and a flexibility that lets you take it in any direction depending on the occasion and the table. The technique is straightforward, the one-pot format keeps cleanup minimal, and the leftovers are genuinely worth looking forward to the following day. Simmer the chicken whole, shred it properly, mash a quarter cup of beans for the most natural thickness, and add the cream cheese off the boil. Those four things done right produce a bowl of white chicken chili that stands completely on its own without needing anything from the toppings table to feel complete. Build the classic version first — then move through the slow cooker variation, the salsa verde twist, and the spicy build. Every version is worth making and every version starts from the same reliable foundation.
FAQs
Q: How do I thicken white chicken chili without making it gluey? The most effective and natural thickening method is the mashed bean technique — remove approximately ¼ to ½ cup of the cooked white beans, mash them completely with a fork or the back of a spoon, and stir the paste back into the simmering chili. The bean starch thickens the broth naturally and adds body without any cornstarch or flour. The cream cheese also contributes significant thickening as it melts into the broth. If the chili is still thinner than you’d like after both of these steps, simmer uncovered for an additional 5–8 minutes to reduce the liquid further before adding the sour cream.
Q: Can I make white chicken chili in a slow cooker? Yes — and the slow cooker version is one of the best applications for this recipe. Combine everything except the cream cheese, sour cream, and lime juice in the slow cooker insert. Cook on low for 6–8 hours or on high for 3–4 hours. Remove the chicken, shred it, and return it to the pot. Switch to the high setting, add the softened cubed cream cheese, and stir for 10–15 minutes until fully melted and incorporated. Stir in the sour cream and lime juice, taste, adjust seasoning, and serve. The slow cooker version develops a deeper, more settled flavour than the stovetop method and requires almost zero active cooking time — ideal for any day where dinner needs to be ready without any effort in the evening.
Q: What white beans work best in white chicken chili? Cannellini beans are the most widely used and generally the best choice — they are large, have a creamy, buttery texture when cooked, and hold their shape through the simmering process without turning mushy. Great Northern beans are slightly smaller and have a milder, more neutral flavour — they work equally well and are often more affordable. Navy beans are the smallest option and produce the most starchy, thickening effect when mashed — useful if a very thick chili is the goal. All three are interchangeable in this recipe at the same quantity — choose whichever is available or most affordable, as the spice blend and cream cheese base provide the primary flavour regardless of which white bean variety is used.