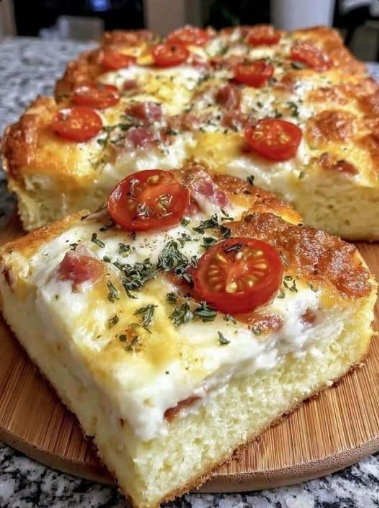
FULL CHEESY PAN PIZZA RECIPE
Yield: 1 large 12-inch pizza, about 8 slices
Prep: 30 minutes active
Rising: 2–3 hours same-day, or overnight for better flavor
Bake: 18–25 minutes
Difficulty: Intermediate
1. INGREDIENTS — DOUGH
Dry ingredients
3 cups (375 g) bread flour
1½ tsp instant yeast
1½ tsp fine salt
1 tbsp granulated sugar
Wet ingredients
1¼ cups (300 ml) warm water
2 tbsp olive oil
1 tbsp melted butter, optional
For the pan
3 tbsp olive oil
1 tbsp butter, optional
Water temperature: about 100–110°F (38–43°C) if you’re using active dry yeast.
Why bread flour?
Bread flour gives you more gluten development, which helps create the stretchy, chewy crust. All-purpose flour also works, but the finished crust may be slightly softer.
2. HOMEMADE PIZZA SAUCE
You’ll need approximately ¾–1 cup sauce.
Ingredients
1 can (15 oz / 425 g) crushed tomatoes
2 tbsp tomato paste
1 tbsp olive oil
1 tsp dried oregano
1 tsp dried basil
½ tsp garlic powder
½ tsp onion powder
½ tsp salt
¼ tsp black pepper
¼ tsp red pepper flakes, optional
½ tsp sugar, optional
1 small garlic clove, finely grated
Make it
Add everything to a saucepan.
Bring to a gentle simmer.
Cook 10–15 minutes, stirring occasionally.
Taste and adjust the salt.
Cool completely before putting it on the dough.
Important: Don’t use a very watery sauce. A thicker sauce works better for pan pizza because excess moisture can make the center soggy.
3. THE CHEESE — THIS IS THE SECRET
For the appearance in your photograph, use a high-moisture/stretchy cheese plus low-moisture mozzarella.
Best combination
12 oz (340 g) low-moisture whole-milk mozzarella, shredded
4 oz (115 g) provolone, shredded
2 oz (55 g) Monterey Jack, shredded
2 tbsp Parmesan, finely grated
Total: approximately 18 oz / 510 g cheese
That’s intentionally a lot of cheese because the pizza in the photograph has a very heavy cheese layer.
If you want maximum cheese pull
Use:
70% mozzarella + 20% provolone + 10% Monterey Jack
Fresh mozzarella can also be used, but drain it extremely well and pat it dry first. Low-moisture mozzarella is particularly useful when you want strong melting and browning without adding too much water.
DON’T use
Avoid using only fresh mozzarella straight from the package. It contains substantially more moisture and can make the pizza watery.
Also, for the best melt, grate mozzarella from a block rather than relying entirely on pre-shredded cheese.
4. OPTIONAL TOPPINGS
The photograph looks primarily cheese-focused, but you can add:
Pepperoni
3–4 oz
Cooked sausage
4 oz
Chicken
½ cup cooked, chopped chicken
Vegetables
¼ cup sliced mushrooms
¼ cup bell pepper
¼ cup thinly sliced onion
¼ cup black olives
Don’t overload the pizza. Heavy toppings release moisture and can interfere with the crispy bottom.
5. MAKE THE DOUGH
Step 1 — Activate yeast
If using active dry yeast:
Mix:
300 ml warm water
sugar
yeast
Let stand 5–10 minutes.
You should see some foam.
If using instant yeast, you can simply mix it directly with the flour.
Step 2 — Combine
In a large bowl combine:
375 g flour
salt
yeast mixture
Mix until you have a shaggy dough.
Add:
2 tbsp olive oil
Mix until the flour is completely hydrated.
Step 3 — Knead
Knead by hand for approximately 7–10 minutes.
Or use a stand mixer with a dough hook for approximately 5–7 minutes.
The dough should become:
smooth
elastic
slightly tacky
soft
Don’t keep adding flour just because the dough feels sticky.
A slightly sticky dough produces a softer, airier crust.
6. FIRST RISE
Lightly oil a bowl.
Put the dough inside and turn it once so the surface is coated.
Cover.
Let rise at room temperature for approximately:
1½–2 hours
or until noticeably larger and puffy.
For better flavor, you can instead refrigerate the dough for 12–24 hours, then allow it to come back toward room temperature before shaping. Overnight proofing is commonly used for pan-pizza dough.
7. PREPARE THE PAN
This step is very important for the photograph-style crust.
Use:
12-inch cast-iron skillet, or
heavy 12-inch metal pizza pan, or
9×13-inch metal baking pan for a rectangular pizza.
Add:
3 tbsp olive oil
to the pan.
Spread it across the bottom and sides.
Don’t be afraid of the oil.
The oil helps fry the bottom of the dough and creates that golden, crunchy base.
8. PUT THE DOUGH IN THE PAN
Place the risen dough into the oiled pan.
Turn it over once so both sides are coated.
Using your fingertips, gently press the dough outward.
Don’t use a rolling pin.
Press it toward the edges.
If the dough keeps springing back:
STOP.
Cover it and wait 10–15 minutes, then stretch again.
This allows the gluten to relax. King Arthur similarly recommends allowing the dough to rest when it resists being stretched to the edges.
9. SECOND RISE
Once the dough reaches the edges:
Cover the pan.
Let it rise at room temperature for approximately:
1½–2 hours
The dough should become noticeably:
puffy
soft
airy
slightly jiggly
This second rise is one of the keys to getting that thick, fluffy crust seen in the photograph.
10. PREHEAT THE OVEN
Set your oven to:
450°F / 232°C
Place a rack in the lower third of the oven.
Preheat for at least 30 minutes.
A hot oven helps the bottom brown while the cheese melts and bubbles. Pan-pizza recipes commonly use temperatures around 400–475°F depending on the dough and pan.
11. BUILD THE PIZZA
This order is important.
Layer 1 — Cheese
Put approximately:
⅓ of your mozzarella
directly onto the dough.
This creates a cheese barrier between the dough and sauce and helps prevent a soggy crust.
Layer 2 — Sauce
Add:
¾–1 cup pizza sauce
Spread gently.
Don’t drown the dough.
Leave approximately ½ inch around the perimeter.
Layer 3 — Main cheese
Add the remaining:
mozzarella
provolone
Monterey Jack
Make sure some cheese reaches close to the edges.
That cheese touching the oily pan becomes beautifully browned and crispy.
Layer 4 — Parmesan
Sprinkle:
2 tbsp Parmesan
over the top.
Layer 5 — Seasoning
Add:
½ tsp dried oregano
¼ tsp garlic powder
pinch of black pepper
Optional:
chili flakes
12. BAKE
Put the pizza on the lower rack.
Bake for approximately:
18–25 minutes
Start checking around 18 minutes.
You want:
bubbling cheese
golden-brown cheese spots
browned edges
fully cooked center
golden bottom
For an especially browned top, move the pizza to a higher rack for the final 1–3 minutes.
Watch carefully because cheese can go from golden to burnt quickly.
13. CHECK THE BOTTOM
This is the part many homemade pizzas miss.
Carefully lift an edge with a spatula.
The bottom should be:
deep golden brown and crisp.
If the cheese looks perfect but the bottom is still pale:
Put the pan on the stovetop over medium heat for approximately 1–3 minutes.
Watch it constantly.
Several pan-pizza recipes use a short stovetop finish to crisp the bottom after baking.
14. DON’T CUT IT IMMEDIATELY
This is important for that enormous cheese pull.
Remove the pizza from the oven.
Let it rest:
5–10 minutes
Then loosen the edges with a spatula.
Transfer it to a cutting board.
Cut into 8 slices.
HOW TO GET THE HUGE CHEESE PULL IN YOUR PHOTO
If you want the dramatic stretchy cheese:
1. Use whole-milk mozzarella
It melts more generously than reduced-fat mozzarella.
2. Shred it yourself
Freshly shredded cheese generally melts more smoothly than heavily anti-caking-coated pre-shredded cheese.
3. Don’t use cold cheese
Take the shredded cheese out of the refrigerator about 15–20 minutes before assembling.
4. Use enough cheese
For this particular appearance, approximately:
16–18 oz cheese per 12-inch pizza
is appropriate.
5. Don’t overbake
Overbaking dries the cheese and reduces the stretchy effect.
6. Cut while hot
The cheese should still be molten when you lift the first slice.
That’s why the photograph shows those long strands.
EXTRA-CRISPY VERSION
If you want the crust to look more like the photograph:
Before adding the dough, put:
3 tbsp olive oil
1 tbsp melted butter
in the pan.
Then put the dough in.
After baking, give the bottom 1–2 minutes on the stovetop.
The oil essentially fries the dough against the hot metal, creating a crunchy exterior while the interior stays fluffy.
DAIRY-FREE VERSION
Replace the cheese with approximately:
12 oz dairy-free mozzarella
3 oz dairy-free cheddar-style cheese
The texture won’t be exactly the same because conventional mozzarella has distinctive melting/stretching properties.
GLUTEN-FREE VERSION
Use a 1:1 gluten-free pizza flour blend formulated for yeast breads.
Because gluten-free dough behaves differently, don’t expect the same stretch or chew.
ALLERGEN / NUT INFORMATION
This recipe naturally contains:
Wheat/gluten: from flour
Milk/dairy: mozzarella, provolone, Monterey Jack and Parmesan
It does NOT inherently contain:
Peanuts
Tree nuts
Eggs
Fish
Shellfish
Soy
However: commercially prepared cheese, flour, sauces, pepperoni and toppings can have allergen cross-contact. If someone has a serious allergy, check each package’s allergen statement and facility warnings.
Q&A
Q: Can I use all-purpose flour?
Yes. Use the same weight, about 375 g. Bread flour will generally give you a chewier crust.
Q: Can I make the dough the night before?
Yes—and I recommend it.
After kneading, refrigerate the covered dough for approximately 12–24 hours. Bring it out and allow it to warm before stretching it into the oiled pan.
Q: Why is my crust dense?
Usually one of these:
Dough didn’t rise enough.
Yeast was inactive.
Too much flour was added.
Dough was pressed too aggressively after rising.
Second rise was skipped.
Q: Why is the center soggy?
Most commonly:
too much sauce
watery toppings
fresh mozzarella wasn’t drained
pizza wasn’t baked long enough
oven wasn’t fully preheated
Q: Why didn’t my cheese stretch?
Use whole-milk low-moisture mozzarella, don’t overbake it, and serve while hot.
Q: Can I use fresh mozzarella?
Yes. Drain it very well and pat it dry with paper towels before using.
Q: Can I freeze the dough?
Yes.
After the first rise, place the dough in an airtight freezer bag/container and freeze for up to about 2–3 months for best quality.
Thaw overnight in the refrigerator, then bring it toward room temperature before putting it into the oiled pan.
Q: Can I use a glass baking dish?
You can, but I prefer cast iron or metal for this particular pizza because they brown the bottom more effectively.
Q: Why does my cheese burn before the crust is done?
Your rack may be too high or the oven may be too hot for your pan.
Move the pizza lower and reduce the temperature slightly if necessary.
Q: How do I get the browned cheese around the edges?
Push some shredded mozzarella right up against the perimeter of the dough so it contacts the oiled pan. That cheese will brown and crisp.
Q: Can I add pepperoni?
Absolutely. Put pepperoni under or over the final cheese layer. For a crispier pepperoni, put some pieces directly on top.
Q: Can I use chicken?
Yes, but use fully cooked chicken. Don’t put raw chicken onto this pizza unless you are specifically using a method that guarantees the chicken reaches a safe internal temperature.
Q: Can I make this without a cast-iron skillet?
Yes. A heavy metal pizza pan or 9×13-inch metal baking pan works well.
Q: How do I reheat leftovers?
For the closest-to-fresh texture:
425°F / 220°C for 6–10 minutes
in an oven or toaster oven.
An air fryer also works very well at approximately 375°F / 190°C for 3–5 minutes.
Avoid microwaving if you want a crispy crust.
MY RECOMMENDED FORMULA FOR THE PHOTO
If your goal is specifically that picture, I’d make it this way:
Dough
375 g bread flour
300 g water
1½ tsp instant yeast
1½ tsp salt
1 tbsp sugar
2 tbsp olive oil
Pan
3 tbsp olive oil
1 tbsp butter
Sauce
¾ cup thick pizza sauce
Cheese
12 oz whole-milk low-moisture mozzarella
4 oz provolone
2 oz Monterey Jack
2 tbsp Parmesan
Bake
450°F / 232°C
lower rack
approximately 20–23 minutes
optional 1–2 minute stovetop finish