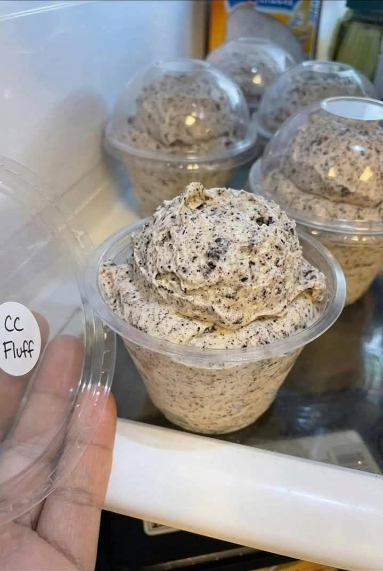
Creamy Chocolate Dessert Mousse — Full Recipe
The dessert in your photo looks like a thick, fluffy chocolate cream/mousse—smooth enough to scoop into a glass, but firm enough to hold those beautiful swirls. The exact recipe from the photo can’t be confirmed from the image alone, but this version is designed to give a very similar texture and appearance.
A classic chocolate whipped cream uses heavy cream, cocoa and powdered sugar; whipping to firm peaks is what creates the airy structure seen in the photo.
Quick Details
Yield: 5–6 servings
Prep: 15 minutes
Chilling: 1–2 hours
Total: About 2 hours
Difficulty: Easy
No oven required
Texture: Thick, silky, fluffy
Flavor: Creamy, milky chocolate
Ingredients
Main chocolate cream
2 cups (480 ml) cold heavy whipping cream, 35%+ fat
½ cup (150 g) sweetened condensed milk
¼ cup (25–30 g) unsweetened cocoa powder
2 tablespoons (25 g) powdered sugar
1 teaspoon vanilla extract
Pinch of salt
Optional — for deeper chocolate flavor
60 g (2 oz) semisweet or dark chocolate
1 teaspoon instant espresso powder
Optional toppings
Chocolate shavings
Cocoa powder
Mini chocolate chips
Chopped nuts
Fresh strawberries or raspberries
Step-by-Step
1. Chill everything
Put your mixing bowl and beaters in the refrigerator for 10–15 minutes.
Keep the whipping cream refrigerated until you’re ready to use it.
Cold cream whips much more effectively than warm cream.
2. Sift the cocoa
Sift together:
¼ cup cocoa powder
2 tablespoons powdered sugar
pinch of salt
This prevents cocoa lumps.
Cocoa whipped cream recipes commonly sift the cocoa and sugar before incorporating them into the cream.
3. Start whipping the cream
Pour the cold heavy cream into your chilled bowl.
Beat on medium speed for about 1–2 minutes.
You want it to begin thickening but not reach stiff peaks yet.
4. Add the condensed milk
Slowly drizzle in the 150 g sweetened condensed milk while continuing to mix.
Add the vanilla.
Continue beating on medium speed.
Important:
Don’t dump everything in at once.
Gradual addition helps maintain a smooth mixture.
5. Add cocoa
Reduce the mixer to low.
Add the sifted cocoa mixture gradually.
Once incorporated, increase the speed to medium-high.
Beat until you have firm, fluffy peaks.
This usually takes another 1–3 minutes, depending on your mixer.
Chocolate whipped cream is generally whipped until it reaches firm peaks, similar to regular whipped cream.
Don’t overwhip!
Stp as soon as the mixture becomes:
thick
smooth
fluffy
able to hold a peak
If you continue whipping too long, the cream can become grainy and eventually start turning into butter.
Optional: Make It Extra Chocolatey
For a richer version, melt:
60 g / 2 oz semisweet or dark chocolate
Allow it to cool until barely warm.
With the mixer on low, slowly drizzle it into the whipped cream.
Then mix just until smooth.
Result:
You get a much richer, more mousse-like chocolate flavor.
6. Transfer to glasses
Spoon the chocolate cream into serving glasses.
For the appearance in your photograph, don’t smooth the surface completely.
Use the back of a spoon to create large swirls and peaks.
You can also put the mixture into a piping bag fitted with a large star tip and pipe it into the glass.
7. Chill
Refrigerate for at least 1 hour.
For a firmer dessert:
Chill 2–4 hours.
The texture becomes thicker and more mousse-like as it chills.
Optional Chocolate Garnish
Dust lightly with cocoa powder.
Or add:
grated chocolate
chocolate curls
crushed cookies
berries
chopped nuts
Serve cold.
NUT & ALLERGEN INFORMATION
Naturally nut-free?
Yes—if you use nut-free ingredients.
The basic recipe contains:
Dairy
No peanuts
No tree nuts
No wheat
No eggs
No gelatin
However, chocolate, cocoa and condensed milk can have cross-contact warnings, so anyone with a serious nut allergy should check the individual product labels.
Common allergens
Ingredient Allergen
Heavy cream Milk
Condensed milk Milk
Chocolate Usually milk/soy depending on product
Cocoa Usually none, but check manufacturing label
Vanilla Usually no major allergen
Want Nuts?
Excellent additions include:
Hazelnut
Add 2–3 tablespoons finely chopped toasted hazelnuts.
Almond
Add 2–3 tablespoons toasted sliced almonds.
Peanut
Add 2 tablespoons smooth peanut butter to the condensed milk before whipping.
Pistachio
Sprinkle 2 tablespoons finely chopped pistachios over the finished dessert.
For a nut allergy, obviously omit these and use chocolate/cocoa products appropriate for the allergy.
Nutrition — Approximate
Using the basic recipe and dividing it into 6 servings:
Nutrient Approx. per serving
Calories ~330–380 kcal
Protein ~4–5 g
Carbohydrates ~25–30 g
Fat ~25–28 g
Saturated fat ~16–18 g
Sugar ~22–25 g
Fiber ~2 g
Sodium ~60–100 mg
These are estimates. Actual values vary considerably with the brands of cream, condensed milk and cocoa.
Adding chocolate or nuts will increase the calories.
How to Get the EXACT Thick Texture in the Photo
The biggest trick is not simply adding more cocoa.
You need the right whipping stage.
For soft mousse:
Whip to soft/medium peaks.
For the pictured thick texture:
Whip to firm peaks.
For piping:
Use stabilized whipped cream.
A small amount of gelatin or another stabilizer can help whipped cream maintain its shape for longer; stabilized chocolate whipped-cream formulas specifically use this approach.
Stabilized Version
If you’re making this for a party and want the swirls to remain beautiful for several hours:
Add:
1 teaspoon unflavored gelatin
2 tablespoons cold water
Sprinkle gelatin over the cold water.
Let stand 5 minutes.
Gently warm until dissolved.
Allow it to cool slightly.
Whip your cream until it reaches soft peaks, then slowly drizzle in the gelatin while mixing.
Continue to firm peaks.
This produces a more stable cream that holds its shape better.
Q&A
Q: Can I make it without condensed milk?
Yes.
Replace it with:
½ cup powdered sugar
1–2 tablespoons milk
The condensed milk contributes both sweetness and body, though, so the texture won’t be exactly the same.
A conventional chocolate whipped cream can be made simply from heavy cream, cocoa and powdered sugar.
Q: Can I use evaporated milk?
Not as a direct replacement.
Evaporated milk doesn’t have the same sweetness or thickness as sweetened condensed milk.
Q: Can I use regular milk?
Not for the main whipping component.
You need heavy whipping cream to create the structure.
Q: Can I use coconut cream?
Yes.
Use full-fat canned coconut cream, chilled overnight.
The finished dessert will have a noticeable coconut flavor.
Q: Why isn’t my cream getting thick?
Possible causes:
Cream isn’t cold enough.
Cream has insufficient fat.
Bowl is warm.
Condensed milk was added too quickly.
You’re using regular milk instead of whipping cream.
The mixture was under-whipped.
Put the bowl in the refrigerator for 15–20 minutes and try again.
Q: Why did my chocolate cream become grainy?
You probably overwhipped it.
Stop immediately when stiff peaks form.
If it’s only slightly grainy, gently fold in 1–2 tablespoons cold heavy cream by hand.
Q: Is this chocolate mousse?
It’s mousse-like, but technically this version is closer to a chocolate whipped-cream dessert.
Traditional chocolate mousse can contain melted chocolate and/or egg components. This version gets its airy texture primarily from whipped cream.
Q: Can I make it less sweet?
Yes.
Reduce the condensed milk to 100–120 g and use 2 tablespoons powdered sugar or omit the powdered sugar entirely.
If you’re adding dark chocolate, reducing the condensed milk works particularly well.
Q: Can I make it more chocolatey without making it bitter?
Use:
2 tablespoons cocoa + 40–60 g melted semisweet chocolate
rather than simply adding a huge amount of cocoa powder.
A tiny amount of espresso powder also intensifies chocolate flavor without making the dessert taste strongly like coffee.
Q: Can children eat it?
Yes, assuming there are no relevant allergies and the ingredients are suitable.
If you use espresso powder, the amount is very small, but you can omit it for a caffeine-free version.
Q: Can I freeze it?
Yes, but the texture may change after thawing because whipped cream can lose some of its original structure.
For the best texture, refrigerate rather than freeze.
Q: How long does it last?
Keep covered in the refrigerator and ideally consume within 2–3 days.
Don’t leave dairy-based desserts sitting at room temperature for extended periods.
Q: Can I pipe it like the photo?
Absolutely.
For very defined peaks:
Chill the finished cream.
Transfer it to a piping bag.
Use a large open-star tip.
Pipe upward while squeezing steadily.
Stop squeezing before lifting the tip.
For longer-lasting decoration, use the stabilized version.
Delicious Variations
Chocolate Strawberry
Add sliced strawberries between layers.
Chocolate Oreo
Fold in ½ cup crushed chocolate sandwich cookies.
Mocha
Add 1 teaspoon espresso powder.
Nutella-style
Add 3 tablespoons chocolate-hazelnut spread.
Mint Chocolate
Add ¼ teaspoon peppermint extract and chocolate shavings.
Peanut Butter Chocolate
Swirl in 3 tablespoons smooth peanut butter.
Dark Chocolate
Use 70% dark chocolate and reduce the condensed milk slightly.
Best Version for the Photograph
For the same thick, glossy, spoonable look, I’d use:
480 ml heavy cream + 150 g condensed milk + 30 g cocoa + 25 g powdered sugar + vanilla + pinch of salt + 60 g melted dark chocolate.
Whip until firm peaks, spoon into a chilled glass, make deliberate swirls with the back of a spoon, and refrigerate for 2 hours.